
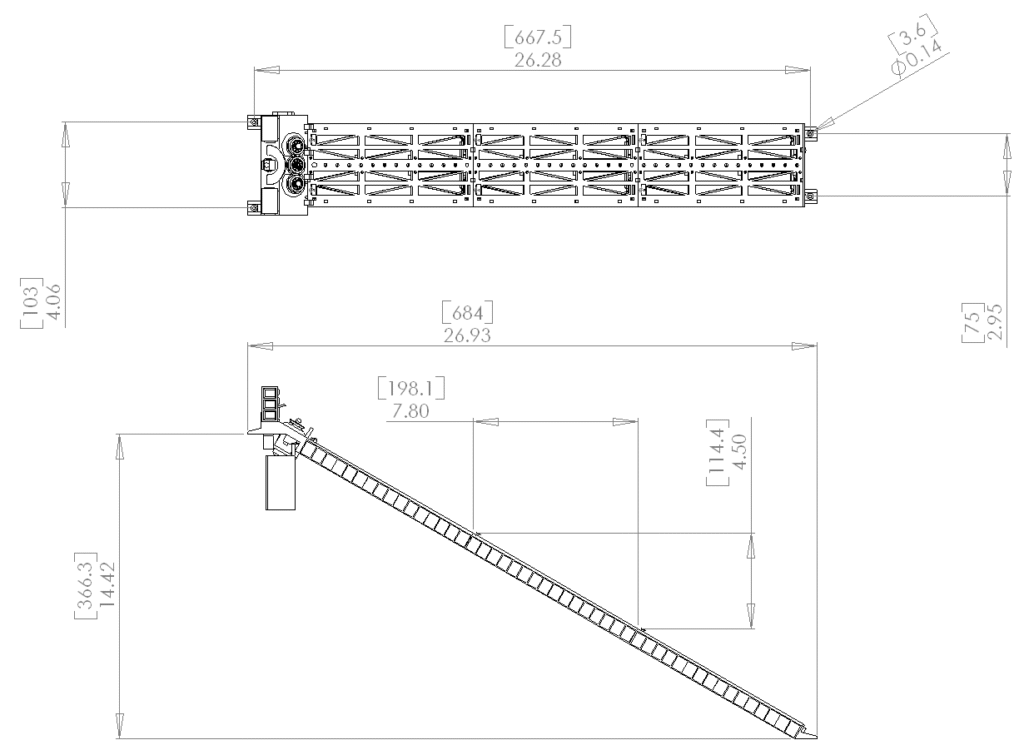
Incline dimensions
The standard three track section model is shown.
If you ordered additional track sections increase the Z dimension 20.97 by adding 4.5 inches times the number of extra track sections, and also increase the X dimension 33.19 by adding 7.8 inches times the number of extra track sections.
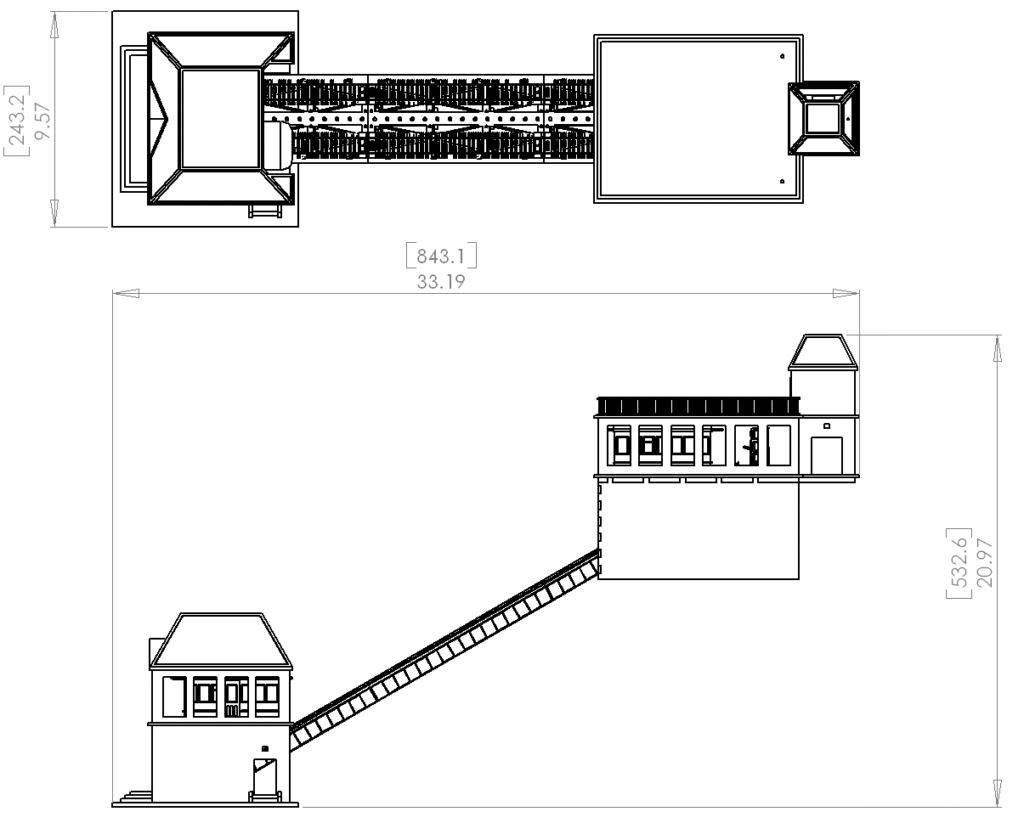
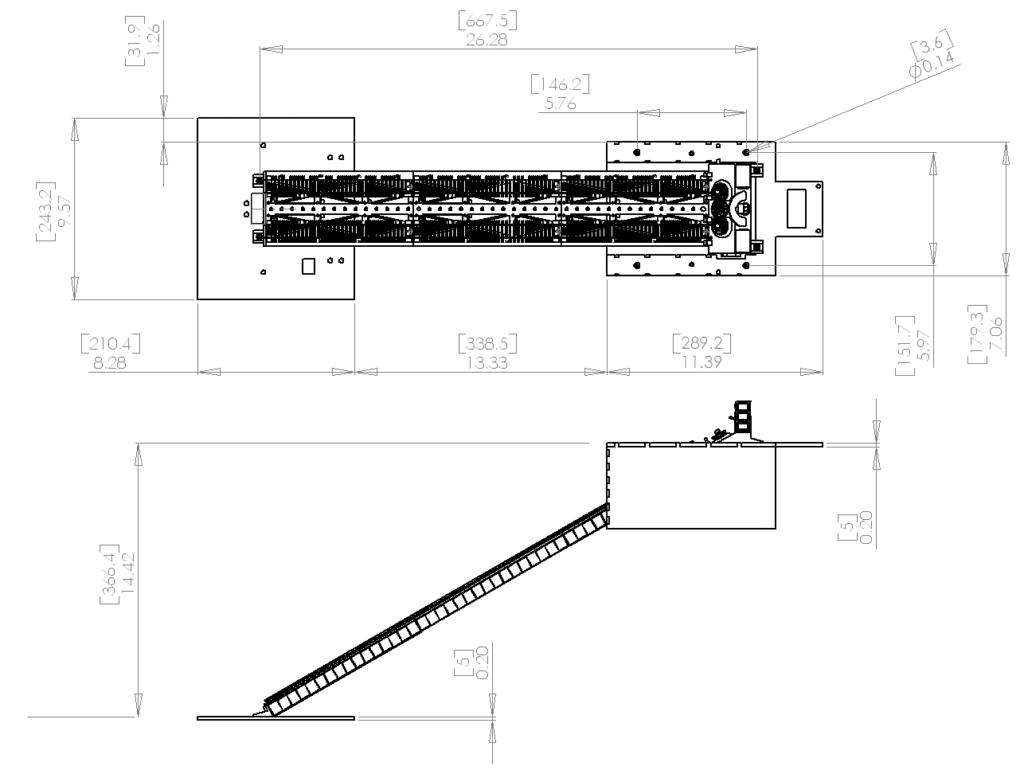
Incline installation
The standard incline comes with a lower house, upper house, two cars, track and stand. The two houses have mounting plates that you install to your benchwork. It is important that this benchwork is level and accurate. The houses set precisely on pins on the mounting plates.
The lower house mounting plate is .20 inches thick. The upper house has the lower granite slope assembly also attached. It has four plastic blocks that allows it to slide on the included stand.
If you choose not to use the stand unscrew the plastic blocks. The lower house mounting plate is also .20 thick. If you are not using the stand you will need to install 3/4 boards on their edges sticking up into the granite slope assembly. This will be clearer when you get the parts.
Once the benchwork is ready set the plates approximately in correct locations, then attach the track assembly. Line up everything up the way you would want and fasten with No 6 counter sunk sheet metal screws. I find these work well in soft wood. You might want to drill a pilot hole though.
Note the upper assembly has counter sunk screw holes, the lower one you can add them where you want them.
Stand assembly
Align the blocks to the crosses. Fasten with four number 6 sheet metal screws. Repeat for a second cross. Attach the crosses to the two uprights using 8 number 6 sheet metal screws. Loosen screws slightly to make sure the stand sits level with your surface.
Use the bottom mount holes to screw into wood strips that you mount on your bench top. Do this after you have placed the unit where you want it.
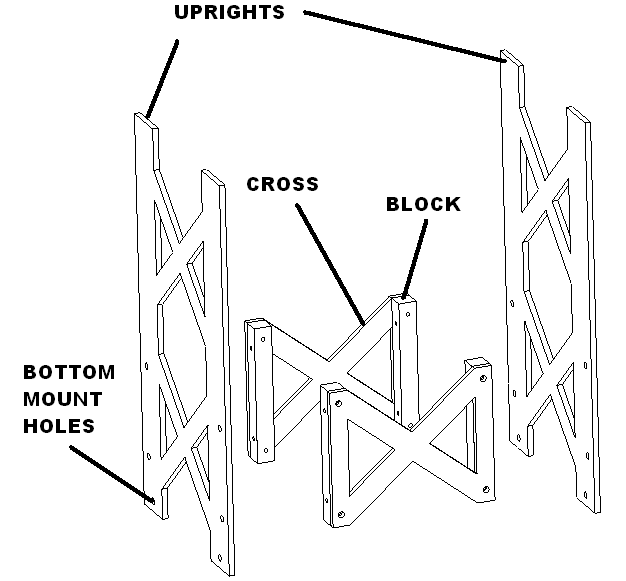
Stand extension assembly
Align the blocks to the crosses. Fasten with two number 6 sheet metal screws. Repeat for a second cross. Attach the crosses to the two uprights using 4 number 6 sheet metal screws. Loosen screws slightly to make sure the stand sits level with your surface.
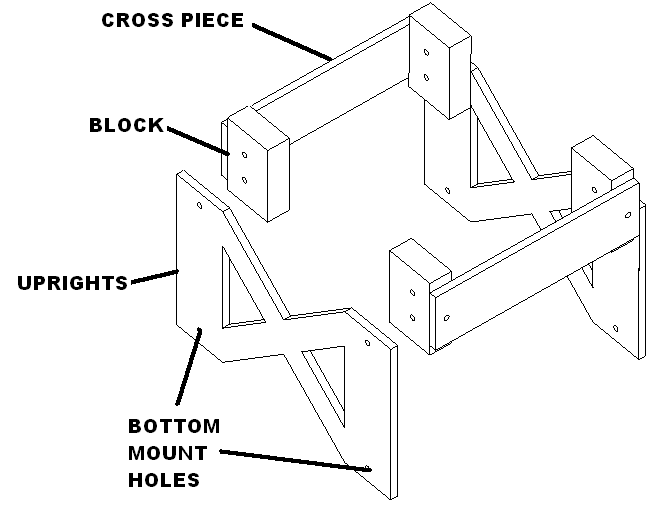
Attach the stand to the extension using 4 number 6 sheet metal screws. Make sure stand is level and plum to your surface and tighten all screws.
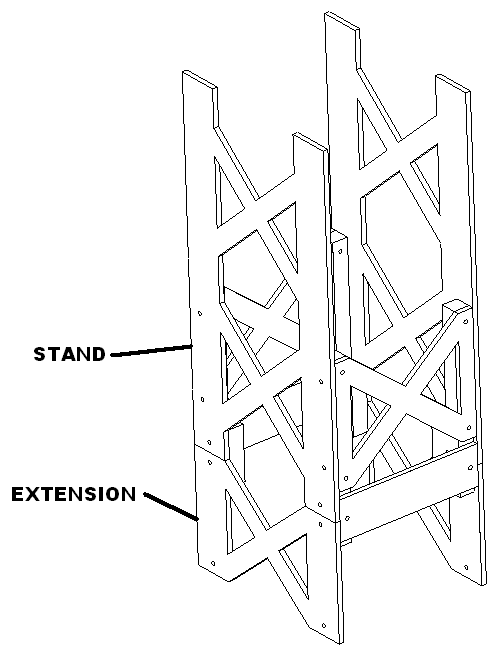
Use the bottom mount holes to screw into wood strips that you mount on your bench top. Do this after you have placed the unit where you want it.
Incline track dimensions
The following dimensions list the X, Z and screw hole X distance for the number of track sections in your order. If your number is not represented in this table add as needed using the x and z increment values. All dimensions are in inches and [mm]. Note: Inclines only come in sections of 3 or more.
| Number of track sections | X | Z | Screw holes X |
| Increment | 7.8 [198.1] | 4.5 [114.4] | 7.8 [198.1] |
| 3 | 26.93 [684] | 14.42 [366.3] | 26.28 [667.5] |
| 4 | 34.73 [882.1] | 18.92 [480.6] | 34.08 [865.6] |
| 5 | 42.53 [1080.3] | 23.42 [594.9] | 41.88 [1063.8] |
| 6 | 50.33 [1278.4] | 27.92 [709.2] | 49.68 [1261.9] |
| 7 | 58.13 [1476.5] | 32.42 [823.5] | 57.48 [1460.0] |
| 8 | 65.93 [1674.6] | 36.92 [937.8] | 65.28 [1658.1] |
| 9 | 73.73 [1872.7] | 41.42 [1052.1] | 73.08 [1856.2] |
What’s in the box
Your incline product comes with the following parts.
- Two houses
- Stand
- Track
- Speakers
- Power supply
Main box with cars, speaker, animator and track.
Open the top of the box. The bottom has the cardboard specification circle. You don’t want to open this end.
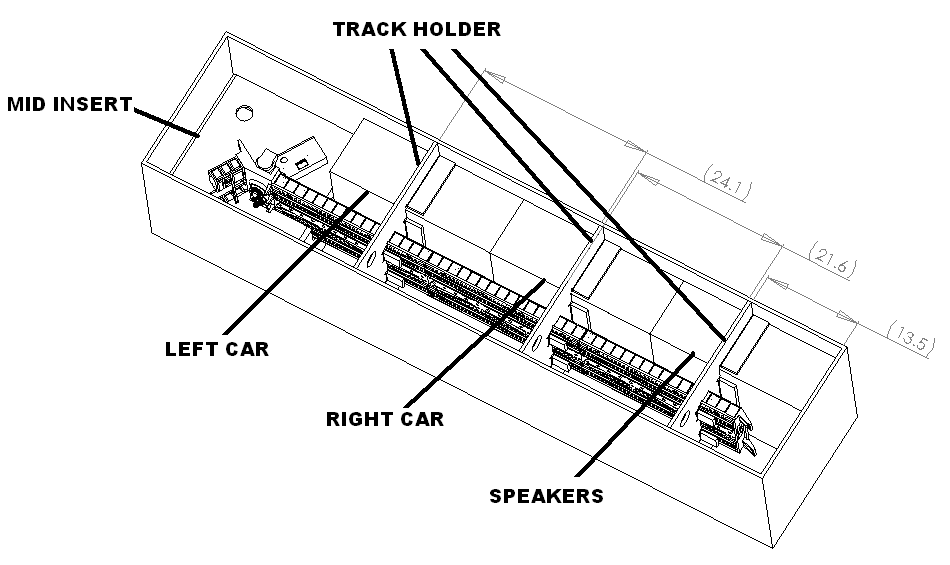
Remove the blue taped items first, the bubble wrapped bag with power supply, figure etc, the spare lenses, the sd card adapter, bagged and tapped wires etc.
Then cut the tape that is holding the tabs down for the track support uprights. At this point the incline should be able to be lifted out using the finger holes.
Carefully untape the uprights and slide off the incline track.
Once this is done you should be able to cut the tape that hold the three boxes that hold the speakers and cars.
Attaching extra track section (only for orders for more than 3 sections)
Attach any additional track sections that came with your order together by first aligning the tack connectors to each track.
Then fasten using 4 M3 X 8 mm socket head screws provided. Make sure you shim and align the tracks sections as necessary and tighten using a M2.5 ball head allen key. Shims are provided to adjust the track section if needed.
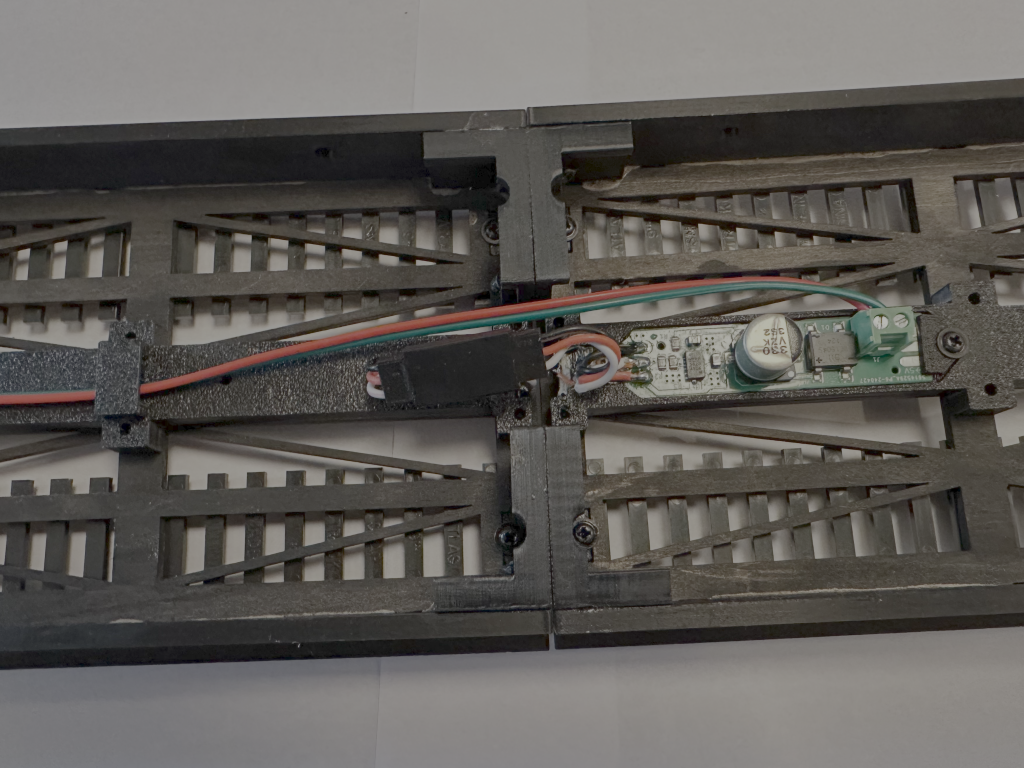
Extra track sections have power injectors to supply extra power. These will need to be hooked up to 12 to 18 V AC or DC. We recommend hooking it up to your 14 volt accessory terminal on your transformer.
These wires are attached at the screw terminals as shown on the right and routed under the holders show on the left.
Plug in one track section into another making sure you match the colors on the plugs.
Mount incline to mounting plates
Find a location for your incline.
The upper house granite assembly slides onto the u shaped brackets inside.
The lower house assemble mounts on the base plate. Attach with 4 no 6 sheet metal screws.
Install car cable
Unwrap car cable from spool. Unwrap from the non square end.
Thread the cable around the idlers pulleys as shown half around the pulley. For the center driving pulley loop around once as shown. This allows the cable to slip if needed but gives it enough friction to drive the cars.
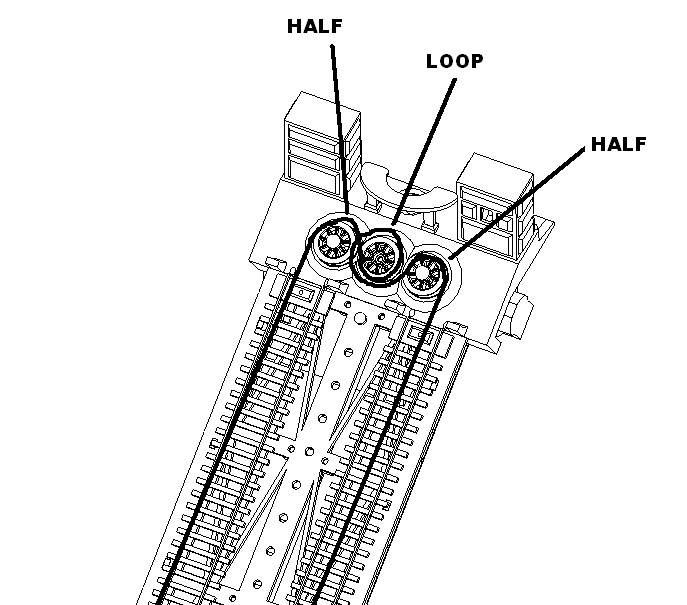
Orient the magnetic hooks up as shown in the video below. Grab both cars and place them near the hooks and they should snap into place. Place cars on track. Make sure the hooks are fulled embedded and point strait toward the front. Get the cars aligned to the track.
Test that the cars will move smoothly up and down the track as shown. If there is a lot of resistance check that you only looped the cable once around the drive pulley.
Familiarize yourself with the animator controller
Switches
Two switches are connected to the animator controller. One is a left switch and one is a right switch.
Power supplies
You can power your animator in two ways
- Plug in the 12 volt DC power supply provided into the barrel connector labeled 12-18 volts AC/DC
- Attach the male barrel connector to your power supply. Ideally it should be 12 volts dc. If using an AC transformer hook it up to 14 VAC accessory power is ideal. If you hook it up to higher voltages like 18 volts ac the cars will run faster.
USB port
This port is also used to change code on the animator. This is done by connecting to a computer using a USB-A to microUSB cable.
MicroSD port
To the left of the animator is the microSD port with a microSD card preinstalled. This card holds the sound files used by the incline program. This can be updated by removing it and putting new files on it from your computer.
Speaker connection
Two sets of twisted wires come out of the animator. One is labeled left and one is label right.
Let’s connect everything up
Connect the speakers to the quick connectors by pressing the tab down inserting the wire into the square hole in the terminal block. Make sure gray goes to gray and white goes to white. The speaker connection are marked left and right speaker. The left speaker should be place near the upper house and the right speaker near the lower house.
Two switches are connected to the animator controller. One is a left switch and one is a right switch. If you want to extend these add 26 gauge wire to them and mount them where you want. Make sure you don’t cut above the label or you will not know which one is which.
Powering up the animator
Now plug in the 12 volt power supply or male barrel connector into the animator.
The animator will startup and when successful it will announce “animations active”
Press the left button and the animation sequence will start. You can stop the animation by pressing the left button again.
Mounting speakers to your layout.
The speaker box has 8 screw holes which are sized to take a No 6 sheet metal screws. I use pan heads which will self tap. The hole depth is 1/2″ so choose the correct length screw as needed.
Operation
There are two buttons. The left button activates the animation. The right button activates the main menu.
After the animation is started you can interrupt it by pressing the left button.
Continuous mode
If you want animations to run continuously you can hold the left button down until you hear the announcement “Continuous mode activated…”
To deactivate press and hold the left button until you hear “Continuous mode deactivated”
Main menu
If you press the right button a message will play “main menu press left button to scroll through items press right button to select the item”.
Press the left button and different options will play. When you hear the option you want press the right button. Further instructions will play for each menu option. If the menu has an “Exit this menu” option use that to get back to “animations are now active”. Menus without “Exit this menu” will automatically go back to “animations are now active”.
Menu summary
- Choose Sounds
- Babys left Dallas
- Banjo romp
- Boxcar blues
- Demo (the animator walk through all the inclines features)
- Fried taters bluegrass
- Hey honey
- Home cookin
- Ragga muffin
- Rattlesnake blues
- Ride with comments (the incline will stop at the upper, middle and lower stations when at the middle comments will be made about the view)
- Ride with out comments (the incline will stop at the upper, middle and lower stations)
- Ride with station stops (the incline will stop at the upper, middle and lower stations when at the middle station stops will be announced)
- Tap room rag
- Randomly choose all sound tracks
- Volume settings
- Volume level adjustment
- Lower volume
- Raise volume
- Hold the right button to commit changes
- Volume level adjustment
- Webpage options
- Web page on
- Web page off
- Hear web url
- Hear instruction on how to enable web access
- Exit this menu
- Add my sound or animate them
- Hear instructions
- Time stamp mode on
- Time stamp mode off
- Exit this menu
- Exit this menu
Choose sounds menu
This option is the most commonly selected menu option. These instructions will demonstrate how to use the main menu.
If you press the right button a message will play “you have entered option mode there are two buttons on the top of the device. The first button will advance through a menu of options the second button will select the option.
Press the left button. When you hear “Choose sounds” press the right mouse button to confirm. You will hear another menu announcement “Sound selection menu…”
Now you will be in the sound selection menu.
Press the left button to scroll through built in songs, your added songs or random sound options.
- Randomly choose all sound tracks
Once you have found the option you want press the right button and it will confirm with “you have successfully selected your option, animations are now active”
Animator web page
Your animator – Incline product can serve a web page on your local network and will look like the following.
You can use the webpage to activate animation, drive the incline and change settings from your phone, tablet or computer. All you need to do is be connected to your local wifi network. Access the incline webpage by typing “animator-incline.local” in your browser.
Click on the tabs “Incline Control, Animations, Settings, Animation tables” to access other pages.
Animations
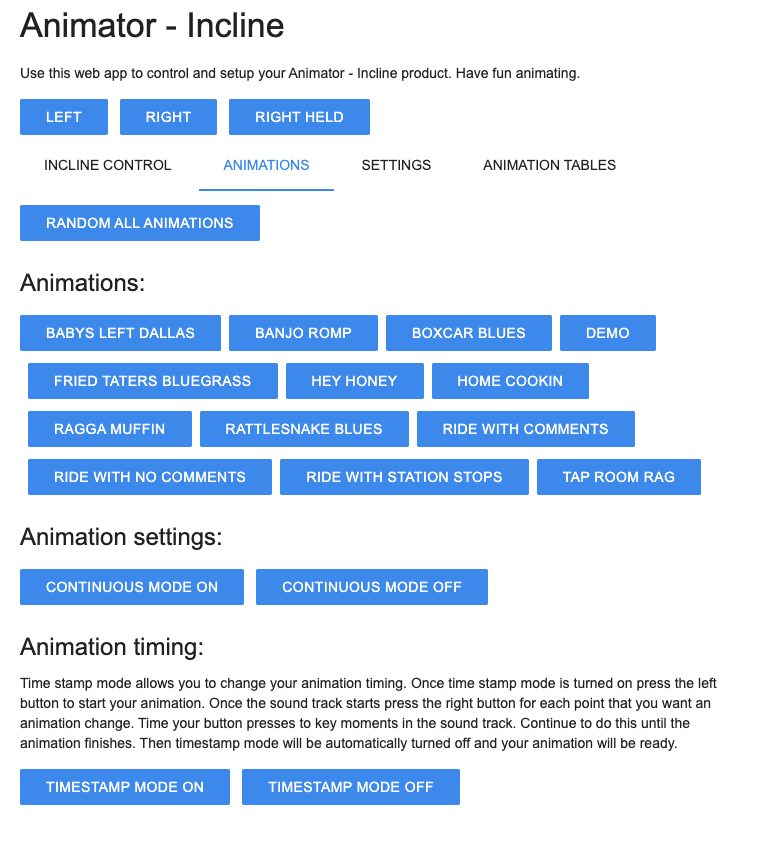
On the animations page you can pick random animation or a specific animation. If you click on “Continuous Mode On” the animation will run continuously.
Note: When choosing any option on the web page the button will change to a lighter color indicating it is in process. You can press other buttons but they will not be processed until the previous button finishes.
Incline control
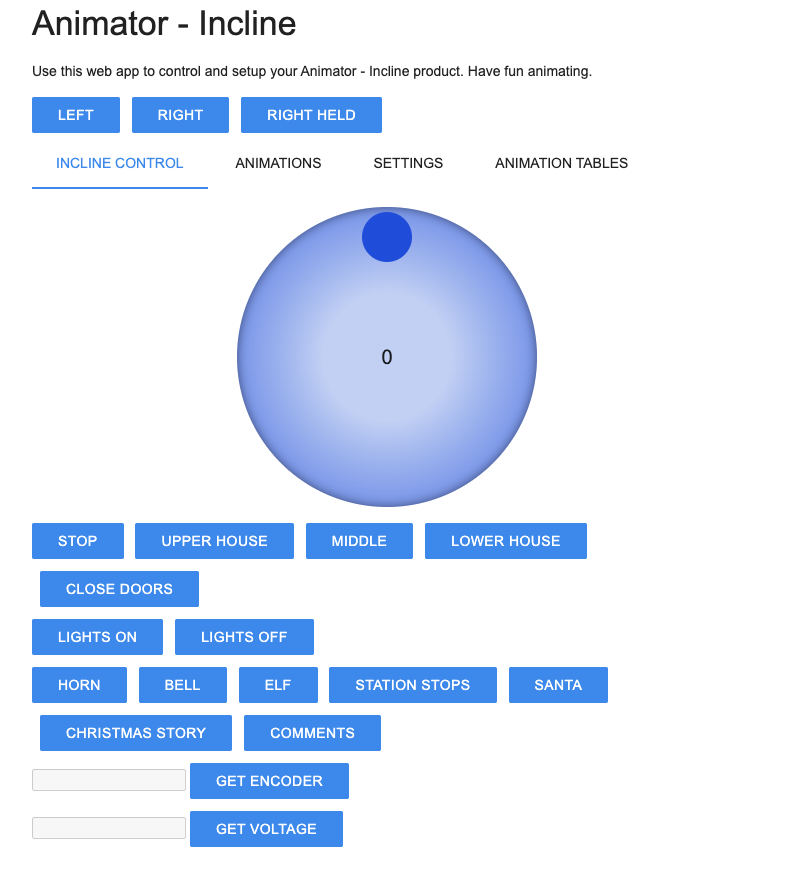
You can drive you incline. The big wheel is the throttle. To the right of twelve o clock moves the right car to the lower station. To the left move the right car to the upper station. You need to move the throttle enough to get it started and then you can back off and go really slow.
The upper house, middle and lower house buttons move the right car to those locations.
Close doors will simulate a closing of doors with sound and green gate light turning to red.
Lights on and off turn off all the lights.
Horn, Bell, Elf… play sounds.
Get encoder shows you where the car is.
Get voltage tells you the voltage the animator sees. This will be lower than the the dc voltage applied because of rectifier voltage drop. If applying ac voltage it will be roughly the rms voltage value.
This page will list the songs you installed on your animator. The list above is an example of songs I installed these song will not be on your Animator. You need to install them your self.
Settings
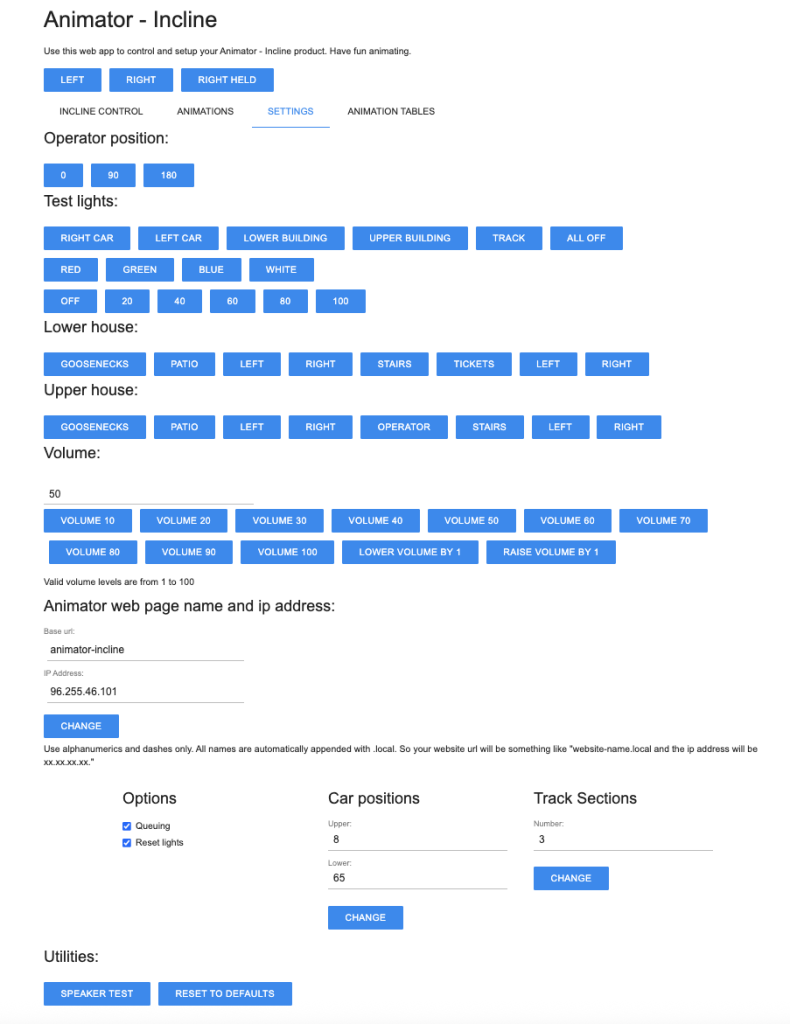
This page will allow you to set different settings.
Operator position will move the operator to the left 0 middle 90 and right 180.
Test light will allow you to turn on various lights and change colors.
Pressing “Volume 10” will set the volume. You can further adjust the volume by pressing the other buttons.
The animator web page name can be changed. Just type in the name desired and press change. The web page will now broadcast at url entered plus dot local appended to the end. This is useful if you have more than one animator and want to distinguish between them.
Options will allow you to set two different modes. Queuing will allow animations to queue in other animations if their script is setup to do so. If turned off queuing is disabled.
Reset lights if set will reset lights to off after an animation finishes. If you want light to remain on uncheck this box.
Car position set the position for the cars in the upper and lower house. This value is set at the factory depending on how long of a track you purchased.
“Reset to defaults” will set the animator to the factory defaults.
“Time stamp mode on” will set your animator in timing mode where you can use the right button to set the transition points in your song. This is used for timing your own songs or can use it to retime the built in tracks if you want. Once set the song you select will be in timestamp mode and you need to press the right button at key points in the song that you want a transition.
Animation Tables tab
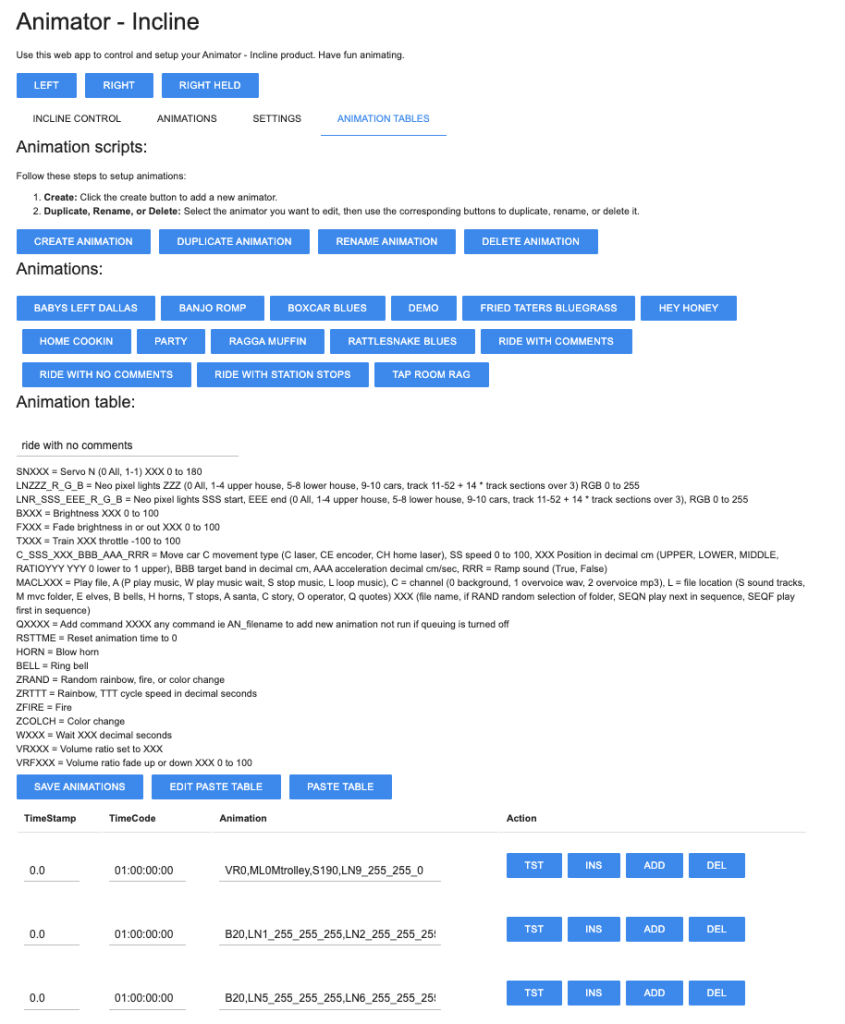
Each animation is controlled by a script table. The script table consists of rows of values TimeStamp, TimeCode and animation commands.
The TimeStamp is in seconds and is when the commands will be called. When manually entering a TimeStamp make sure you hit return so it is accepted.
TimeCode is like a TimeStamp but used when using Davinci Resolve timeline markers to pick times. When manually entering a TimeCode make sure you hit return so it is accepted.
To get a timeline, first press the track you want to change. This will download the timeline to the table. Then edit the animation commands as desired. You can test the animation commands by pressing “TST” on each row.
You can insert “INS”, add “ADD” or delete “DEL” timeline rows as desired.
Once you have made all the changes you want press “SAVE ANIMATIONS”.
Setting up SSID and password to enable web access
To enable web access to your animator you will need to make changes to your microSD card that is inserted in your animator.
The animator is a ioT device and only works on a 2.4G network. So set the SSID and password for that network.
Locate the microSD card.
- Remove the microSD card by first pushing it in and it will pop out so you can grab it.
- Insert the card in a microSD card reader on your computer.
- Make a copy of env_example.json file
- Rename the copy to env.json
- Edit the env.json file with your SSID and password
- After you made your changes reinsert the microSD card in the animator with the gold contacts down and power on your incline.
- It should announce that the animator is now on the network.
- Confirm the web page works by navigating to animator-trolley.local on your computer or phone that is connected to the same network the incline is on.
Adding your own songs
To add your own songs onto the animator you can do this by first converting your songs to a wav file encoded with a sample rate of 22050 Hz and a sample format of 16-bit. They must be in stereo.
You can do this with audacity a free application. https://www.audacityteam.org/
Once you have installed audacity open the music file that you want to put on the animator.
Open your file. Adjust the volume by selecting the whole track and normalize to -1db.
Then go to the file menu and choose export/export as wav. On the export audio screen change the sample rate to 22050 as shown.
Note: Your screen might be different than the one below. See audacity documentation for details.

Then save the file to the microSd card under the “snds” and name it with lower case letters and spaces like “my music file.wav”.
Repeat this for the rest of your songs.
Repeat the above steps for all your songs.
Once you have all your files on the microSD card eject it and reinsert it into the animator and put it back on the track.
Create your own animations
Now that you have created the audio tracks you want for your incline animation you can create an animation using scripts.
Scripts are a table of values that trigger based on time elapsed since the animation started. We call these TimeStamps. You can create these TimeStamps manually by adding rows to your table and entering values or you can create them automatically based on button presses while playing your song.
Scripts are only created using the animators web page. You need to have the animator setup on your for this to work.
Got to the “animations table” and press “create animation” to get started. A dialog will appear to give it a name. Only use numbers and lower case letters in the name. For example “my animation”. Press “Save animation” to create the animation script. You will then see it in the list of buttons. Press the button to open the table.
The first line in the table will be. “MB0name of your track.wav”. Modify this name to match your sound track name for example “MB0name of your track.wav” and press “Save animation”
Now you can timestamp your animations. First select it under the animations tab. The sound track will start and stop.
New select “Timestamp mode on” on the animations page. An anoucement will play giving instructions.
Now you are ready. Press the left switch. The sound track will play. Press the right switch for every time you want a animation to occur. Typically you time it to key moments in the sound track. After the sound track is finished it will announce that the file has been saved. Your animation is now programmed.
Press the left switch and enjoy your animation.
Animation Commands
SNXXX
Servo N (0 All, 1-1) XXX 0 to 180
This command controls the position of the operator, 0 is left, 90 is middle, 180 is right.
LNZZZ_R_G_B
Neo pixel lights ZZZ (0 All, 1-4 upper house, 5-8 lower house, 9-10 cars, track 11-52 + 14 * track sections over 3) RGB 0 to 255
This command controls the neo pixel lights. There are 48 or more lights on the incline where light 1 – 4 is in the upper house where 1 and 2 control 6 lights since the are one color so the r g b value are used two control them. The lower house is similar as well as the cars.
If you use 0 for the ZZZ setting all the lights will be set.
BXXX
B = brightness, XXX = intensity 0 to 100
This is the light brightness command. B0 will turn all the lights off. B100 will set all lights to full brightness.
Note: This will not override the settings set using the LNXXX command. It is primary used before using the FXXX command to fade lights on or off.
FXXX
F = fade, XXX = intensity 0 to 100
This is the light fade command. F0 will fade all the lights to off. F100 will fade all lights to full brightness. B100, F50, will set full brightness and then fade lights to 50.
TXXX
Train XXX throttle -100 to 100
This command controls the throttle. Positive values will make the trolley go forward. Negative ones will make the trolley go backward.
C_SSS_XXX_BBB_AAA_RRR
Move car C movement type (C laser, CE encoder, CH home laser), SS speed 0 to 100, XXX Position in decimal cm (UPPER, LOWER, MIDDLE, RATIOYYY YYY 0 lower to 1 upper), BBB target band in decimal cm, AAA acceleration decimal cm/sec, RRR = Ramp sound (True, False)
This command controls the precise movement of the cars. The incline is equipped with a laser distance sensor which is used for positioning or homing of the right car. C is for laser positioning only good up to 30cm, CH is homing which will set the encoder to 0 when homed at the upper car XXX position. When UPPER is used it will use the upper car position which is set in settings.
Ratio will move the car in between upper and lower house base on a ratio. For example 0.75 will be 3/4 up the incline.
Ramp sound True or False will place background sounds or music while the car is moving. See MACLXXX on how to set this sound.
MACLXXX
Play file, A (P play music, W play music wait, S stop music, L loop music), C = channel (0 background, 1 overvoice wav, 2 overvoice mp3), L = file location (S sound tracks, M mvc folder, E elves, B bells, H horns, T stops, A santa, C story, O operator, Q quotes) XXX (file name, if RAND random selection of folder, SEQN play next in sequence, SEQF play first in sequence)
This command sets the sounds that are played on the animator.
You can play a background sound using the O option. It must be in the snds folder or mvc folder on the sd car and be a wav file. Wav file are not compressed so they don’t use a lot of resources.
The overvoice files should be mp3 files saved on the pydrive only. This is because if they are on the SD card sometimes there is a conflict and the pico will crash.
There are preset folders for overvoice files they are E elves, B bells, H horns …
ZRAND
Random rainbow, fire, or color change.
ZRTTT
Rainbow, TTT cycle speed in decimal seconds
The rainbow command will cause the lights to move colors down the light string for a dynamic rainbow effect.
ZFIRE
This is the fire command which will twinkle the led to look like a fire using random colors.
ZCOLCH
This is the color change command which will set each of the LEDS to a random color of red, blue or green.
MBRXXX
Music background, R repeat (0 no, 1 yes), XXX (file name with wav extension) must be in first row of the script all others row this command will be ignored.
This command sets the music for the background of the animation. This music will immediately play when the animation starts.
The command must be in the first row of the animation at time stamp 0.
If the command is set to repeat mode the sound will repeat over and over. This is primary used for trolley noises. Do not use repeat mode for a musical track you only want to play once and stop.
HA
A (H Horn, B Bell)
This command blows the horn or bell.
Happy Animating!