
Your City Lights CLHV-6 device is a smart lighting controller. It can be programmed to create interesting time-based lighting effects. It is designed to autonomously control a small section of lighting on your layout, but you can also use it to control all the lights on your layout by adding additional light modules.
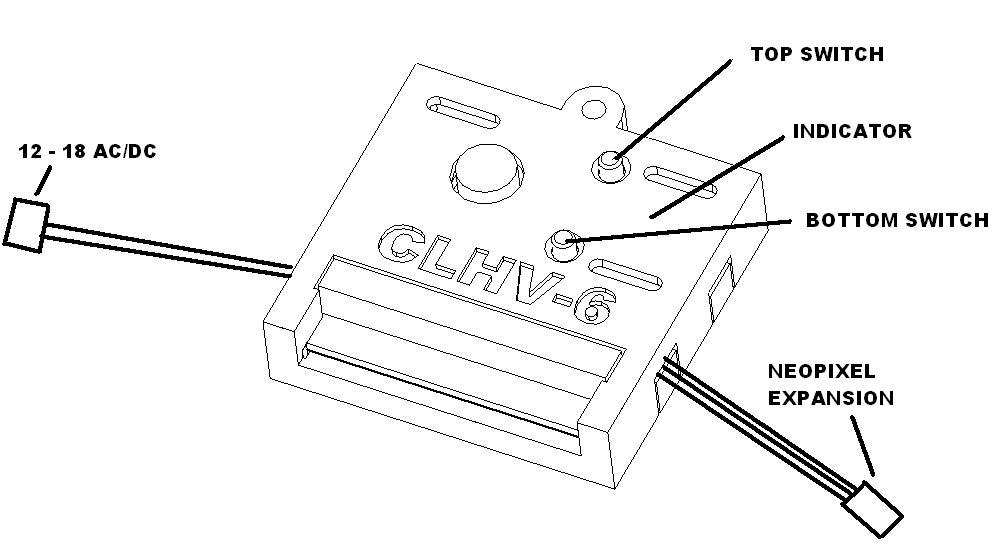
The module has two switches: a top switch and a bottom switch. The top switch starts the animation or allows you to scroll through options. The bottom switch enters script selection mode and allows you to confirm a selection.
Powering up
Your City Lights CLHV-6 has its own internal 5V power supply to power the electronics and neopixel expansion. Just connect to a 12 – 18 volts AC/DC power supply.
Connecting LEDS
Your City Lights CLHV-6 outputs 12 volts to the six outputs on the device. You can safely power any LED rated from 3 volts to 12 volts without using current-limiting resistors. The internal circuitry limits the current flow to 19 mA.
You can connect your LEDs in one of two ways: by using the provided JST-XH plugs or the solder pads. The square pad is negative, and the round pad is 12 volts.
These outputs are designed only for driving LEDs. They cannot drive incandescent bulbs.
LED anode and cathode
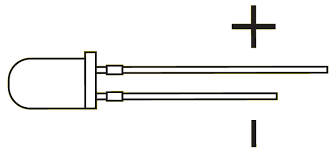
On a typical LED, the anode is the positive, longer lead, and the cathode is the negative, shorter lead with a flat edge on the plastic lens.
Your City Lights CLHV-6 has a common anode bus, which means the positive 12-volt pads are all connected together.
The ground connection is what is controlled.
Top Switch
- Press the top switch to start the animation.
- Press and hold the top switch to enable Continuous Mode. This is indicated by the indicator blinking green twice.
- Press and hold the top switch again while in Continuous Mode to disable it. This is indicated by the indicator blinking red twice.
Bottom Switch
Note: Continuous Mode must be disabled before using the bottom switch.
- Press the bottom switch to enter Script Selection Mode.
- This is indicated by the indicator turning blue. Use the top switch to scroll through the available options.
- Each press will cause the indicator to blink yellow to show the script number:
- 1 blink = first script
- 2 blinks = second script
- and so on
- A white blink indicates Random Selection mode.
- Once the desired option is selected, press the bottom switch to confirm the script. The indicator will turn green again.
Installing your CLHV-6 on your network
Your CLHV-6 can be installed on your network by entering your SSID and password. It is a 2.4 GHz device, so install it on your 2.4 GHz network.
Network connectivity allows you to easily write programs for the device and control it using the City Lights Kiosk product.
You will need a Micro-USB to USB cable.
Plug this cable into your computer. Then, while holding down either the top or bottom switch, plug the Micro-USB cable into the Pi port on the left side of the device. Wait until the indicator turns blue, then release the switch.
If successful, the Pi will mount on your computer as a USB drive.
Open this drive, copy the file env_example.json, and rename the copy to env.json. Edit the file with a text editor and enter the credentials for your 2.4 GHz network. The file will look like the following:
{
“WIFI_SSID”: “your_wifi_id”,
“WIFI_PASSWORD”: “your_wifi_password”
}
Save the file. Unplug the CLHV-6 and plug it in again, but do not hold any switches down. The CLHV-6 will make several attempts to connect to your network, indicated by a blue light cycling between bright and dim.
If the connection is successful, the indicator will turn green. If the connection is not successful, the indicator will turn yellow for three seconds and then turn green.
CLHV-6 web page
Your City Lights CLHV-6 product can serve a web page on your local network. To access the CLHV-6 web page, type clhv-6.local into your browser. The following page will be displayed.
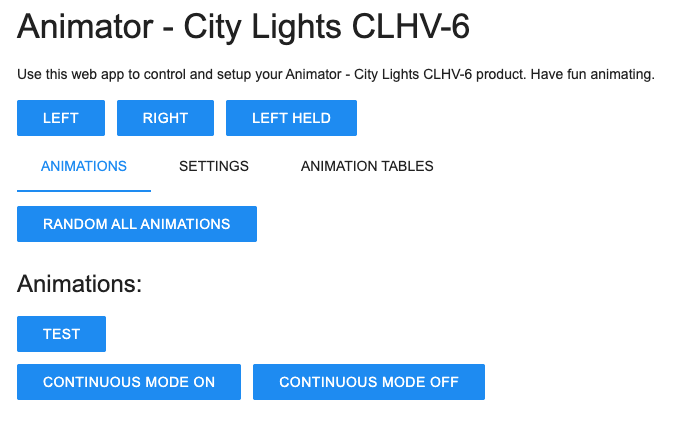
The Animations list shows the animations that exist on your City Lights CLHV-6. This example shows one animation named test.
If you click “Random All Animations,” the CLHV-6 will randomly choose an animation to run from your list of animations.
If you click test, that animation will run.
If you click “Continuous Mode On” or “Continuous Mode Off,” the continuous mode setting will be changed accordingly.
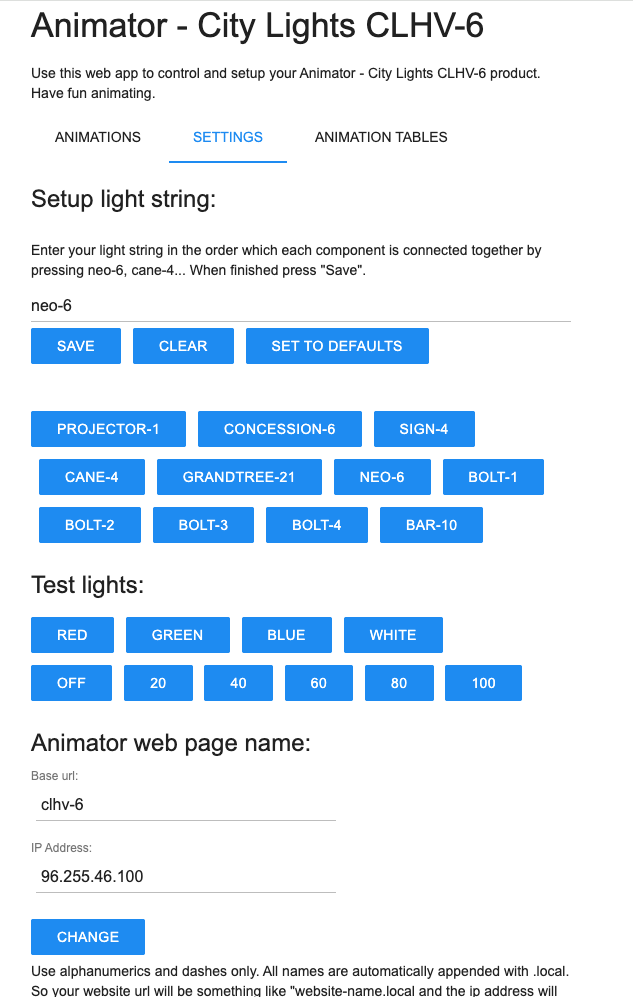
This page allows you to set up your light string. The City Lights CLHV-6 comes with one Neo-6 module, so you must have at least one module in the light string. Additional modules can be added after that.
If you have more than one CLHV-6, you should rename the Base URL for each device. Otherwise, they will conflict on your network. One naming convention could be clhv-6-1, clhv-6-2, and so on. Simply change the name and press “CHANGE.”
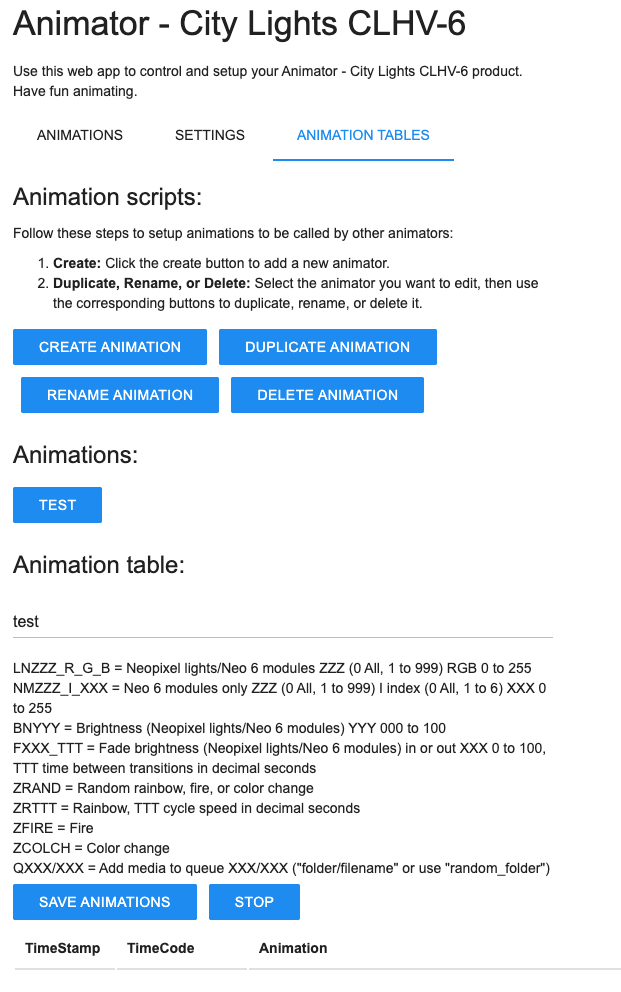
This page is where you set up your animations. Currently, the animation test is shown.
You can press “Create Animation,” “Duplicate Animation,” “Rename Animation,” or “Delete Animation” to manage your animations.
Clicking an animation will display a table of commands. For example, clicking test displays the following:
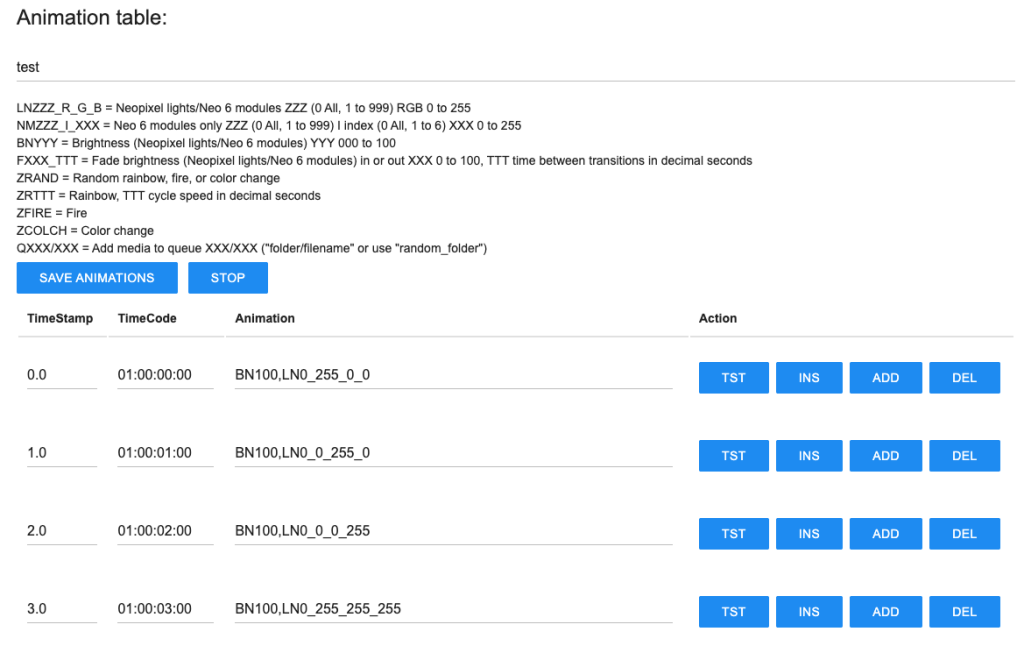
You can insert “INS”, add “ADD” or delete “DEL” timeline rows as desired.
Once you have made all the changes you want press “SAVE ANIMATIONS”
LNZZZ_R_G_B light command
LNZZZ_R_G_B = NeoPixel lights / Neo-6 modules ZZZ (0 = all, 1 to 999) with RGB values from 0 to 255.
ZZZ is the NeoPixel index.
R_G_B are the red, green, and blue color values, ranging from 0 to 255.
In the case of Neo-6 modules, each module consists of two NeoPixels where the red, green, and blue channels control the LEDs. Note: the red and green channels are swapped.
NMZZZ I_XXX neo module command
NMZZZ I_XXX = Neo-6 modules only: ZZZ (0 = all, 1 to 999) | index (0 = all, 1 to 6) XXX (0 to 255)
This command is used for Neo-6 modules. Each module contains a group of six lights. Your CLHV-6 has one Neo-6 module at ZZZ = 1.
You can control each light independently by specifying the light index from 1 to 6 and the intensity value XXX from 0 to 255.
BXXX brightness command
B = brightness, XXX = intensity from 0 to 100
This is the NeoPixel brightness command. B0 will turn all the lights off, while B100 will set all lights to full brightness.
Note: This command does not override the settings configured using the LNXXX command. It is primarily used before using the FXXX command to fade the lights.
FXXX_TTT fade command
FXXX_TTT = Fade XXX 0 to 100, TTT time between transitions in decimal seconds
This is the fade command. F0 will fade all the lights to off. F100 will fade all lights to full brightness. B100, F50, will set full brightness and then fade lights to 50. TTT sets the speed of the fade.
ZRAND
Random rainbow, fire, or color change.
ZRTTT
Rainbow, TTT cycle speed in decimal seconds
The rainbow command will cause the lights to move colors down the light string for a dynamic rainbow effect.
ZFIRE
This is the fire command which will twinkle the led to look like a fire using random colors.
ZCOLCH
This is the color change command which will set each of the LEDS to a random color of red, blue or green.