
Animator – Outhouse Video instructions
The following video explains how to setup your animator outhouse.
TBD
Animator – Text instructions
What’s in the box
Your feller product comes with the following parts
- outhouse
- five volt power supply (older models only), newer ones have accessory power wires
- SD card adapter
- microSD card installed in the animator controller
- speaker
- two switches
- Jimmy Trains business card personally signed by me 🙂
Remove from packaging
Open the top of the box. There is a thumbnail cutout for the top of the box.
After opening there are two cardboard spacers, on has the list of what’s in the box the other has a template for speaker mounting.
First remove the out house but pulling off the top card board piece. Then the out house can be lifted out of its insert.
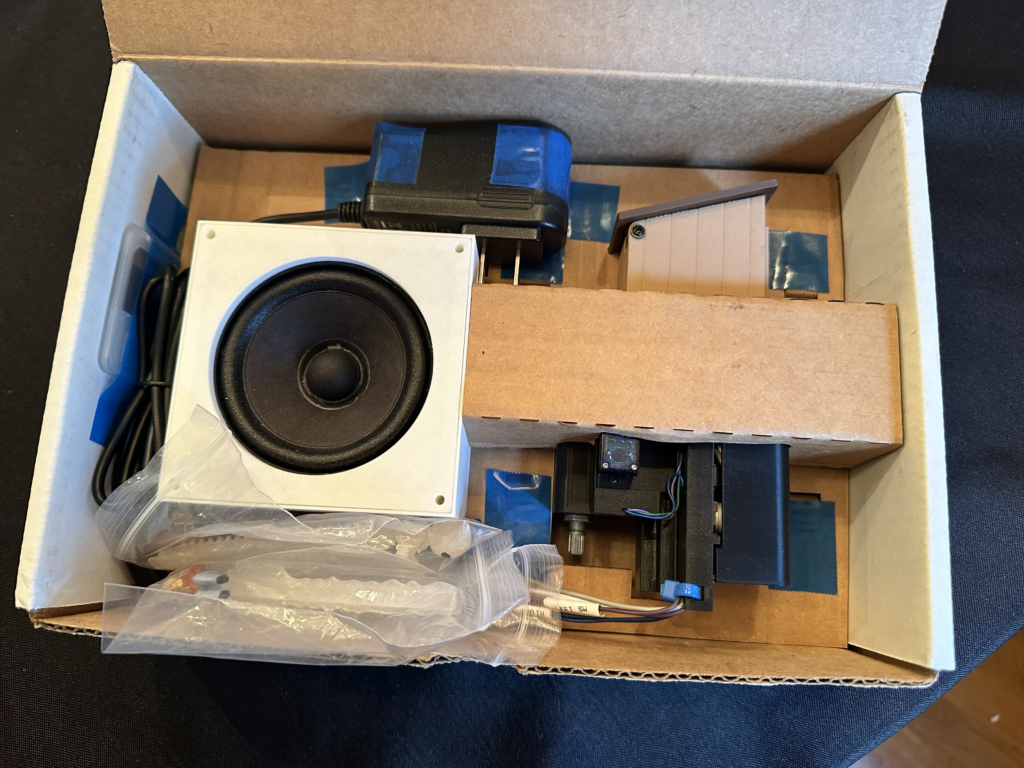
Then grab the speaker by its sides and pull up out of the box. Once removed un tape the speaker from the cardboard insert.
Product dimensions
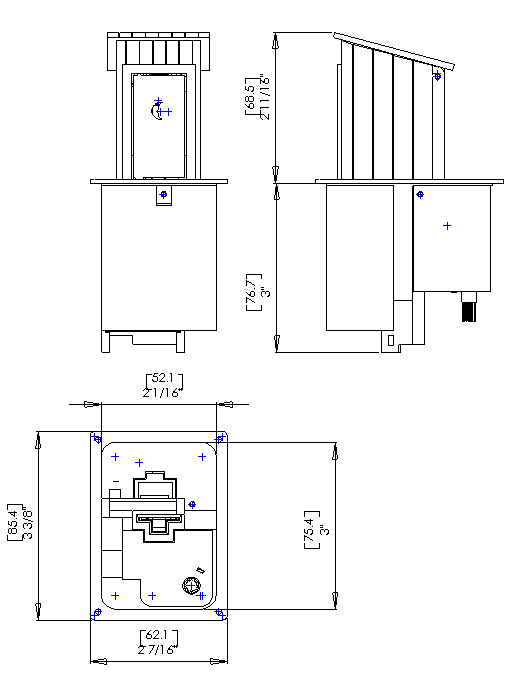
Familiarize yourself with the outhouse
Switches
The outhouse has two switches labelled left and right that are attached. These can be extended by cutting the wires and adding wire to your switch location. Make sure you don’t cut too high and lose the labels marking which one is left and right.
Motors
The outhouse has three motors, one for the door, one for the roof and one for the occupant elevator.
Power supplies
Older models ship with a microUSB power supply. If you have one of those it is plugged in the micro usb port located at the bottom of the assembly. It only goes in one way. Do not force it.
Newer models are powered internally by hooking the black wires labeled 12 – 18 V AC/DC to your transformer. We recommend running at 14 volts ac.
Note: Only power the animator using one of the two methods. If you want to power the new models using a microUSB power supply that you provide, insulate the black wires.
USB port
This usb port is also used to change code on the animator. This is done by connecting to a computer using a USB-A to microUSB cable. It also powered using this port as previously described.
MicroSD ports
Below the USB port is the microSD port with a microSD card preinstalled. This card holds the sound files used by the outhouse program. This can be updated by removing it and putting new files on it from your computer.
Speaker connection
The white and grey wires are for hooking the speaker which also has white and grey wires. Wire nuts should be used to make the connection.
Volume pot
There is a volume pot located on the bottom of the outhouse. The volume can also be set using the buttons.
Powering up the outhouse
Now plug the 5 volt power supply into the animator.
The animator will startup and when successful it will announce “animations active”
Press the left button and the animation sequence will start. The door will open and the occupant motors will run and a dialog will be heard.
These sound tracks are about 10 seconds long. You can stop the sound track by pressing the left button again.
Mounting the speaker to your layout.
The cardboard template should be used to mark where you want to put holes for the speaker mounting.
The speaker box has 8 screw holes which are sized to take a No 6 sheet metal screws. I use pan heads which will self tap. The hole depth is 1/2″ so choose the correct length screw as needed.
Operation
There are two buttons. The left button activates the animation. The right button activates the main menu.
After the animation is started you can interrupt it by pressing the left button.
Continuous mode
If you want animations to run continuously you can hold the left button down until you hear the announcement “Continuous mode activated…”
To deactivate press and hold the left button until you hear “Continuous mode deactivated”
Main menu
If you press the right button a message will play “main menu press left button to scroll through items press right button to select the item”.
Press the left button and different options will play. When you hear the option you want press the right button. Further instructions will play for each menu option. If the menu has an “Exit this menu” option use that to get back to “animations are now active”. Menus without “Exit this menu” will automatically go back to “animations are now active”.
Menu summary
- Choose Dialog
- Dialog Rated G
- Dialog Rated PG
- My sound tracks
- Explosions off
- Explosions low
- Explosions med
- Explosions always
- Exit this menu
- Volume settiing
- Volume pot on
- Volume pot off
- Volume level adjustment
- Press the left button to lower the volume, press the right button to increase the volume, press and hold right button until you hear all changes complete.
- Install figure
- Man
- Remove the figure and insert the figure to install. We ready press the right button to install.
- Woman
- Remove the figure and insert the figure to install. We ready press the right button to install.
- Alien
- Remove the figure and insert the figure to install. We ready press the right button to install.
- Music
- Remove the figure and insert the figure to install. We ready press the right button to install.
- Man
- Move roof and door
- Move door to open position
- Move door to closed position
- Move roof to open position
- Move roof to closed position
- Exit this menu
- Adjust roof or door
- Adjust door open position
- Press the left button to open more, press the right button closed more, press and hold right button until you hear all changes complete.
- Adjust door closed position
- Press the left button to open more, press the right button closed more, press and hold right button until you hear all changes complete.
- Adjust roof open position
- Press the left button to open more, press the right button closed more, press and hold right button until you hear all changes complete.
- Adjust roof closed position
- Press the left button to open more, press the right button closed more, press and hold right button until you hear all changes complete.
- Adjust door open position
- Webpage options
- Web page on
- Web page off
- Hear web url
- Hear instruction on how to enable web access
- Exit this menu
- Exit this menu
Choose dialog menu
This option is the most commonly selected menu option. These instructions will demonstrate how to use the main menu.
If you press the right button a message will play. The left button will advance through a menu of options the right button will select the option.
Press the left button. When you hear “Choose dialog” press the right mouse button to confirm. You will hear another menu announcement “Dialog selection menu…”
Press the left button and different dialog options like “Rated G”.
Once you have found the option you want press the right button and it will confirm with “you have successfully selected your option, animations are now active”
Install the occupant
Carefully take the occupant out of its package. Press the right button to get into the main menu then press the left button to scroll through the options. When you hear install figure menu, press the right button to select.
Another announcement will occur instructing you to scroll through the options. Press the left button until you hear the figure you want to install. Then press the right button and you will get further instructions to remove the figure and insert the figure you want to install. Once inserted press the right button and the figure will be retracted and the roof and doors will close.
Now that the figure is installed you will get specific dialog for that figure.
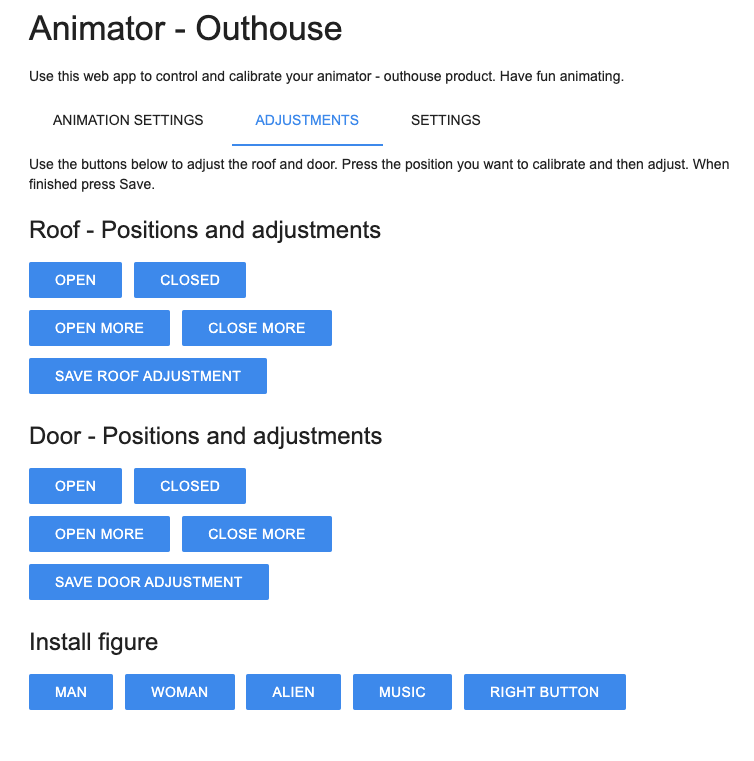
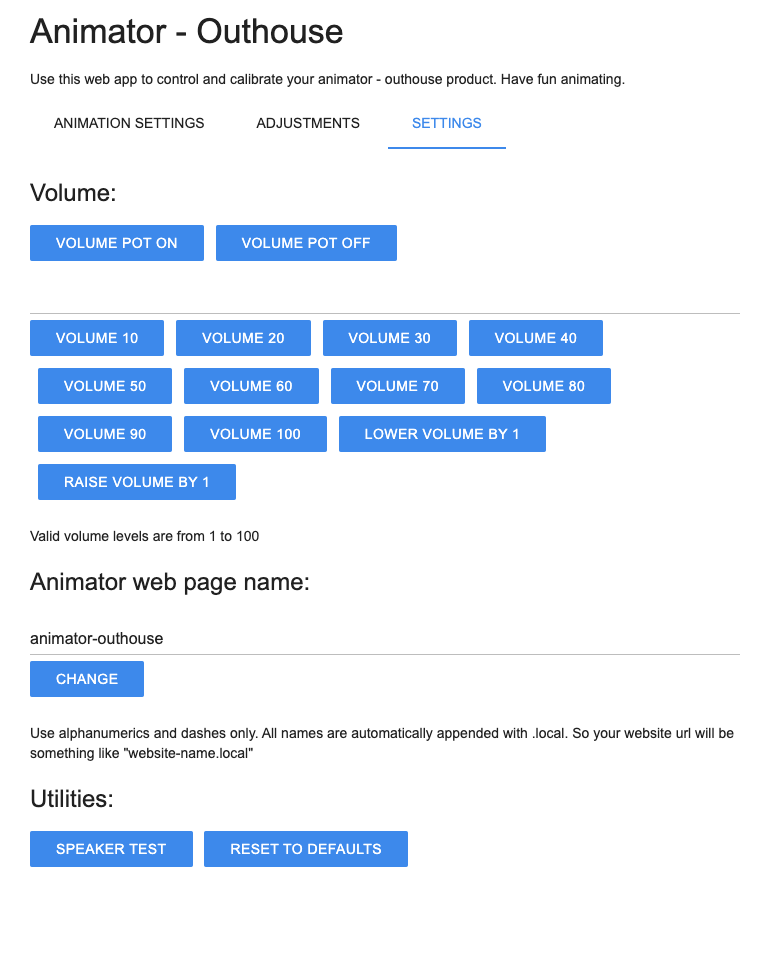
Animator web page
Your animator – outhouse product can serve a web page on your local network and will look like the following.

You can use the webpage to activate animation and change settings from your phone, tablet or computer. All you need to do is be connected to your local wifi network. Access the outhouse webpage by typing “animator-outhouse.local” in your browser.
Click on the tabs “Animations, Adjustments, Settings” to access other pages.
Enabling webpage access
To enable web access to your animator you will need to make changes to your microSD card that is inserted in your animator.
The animator is a ioT device and only works on a 2.4G network. So set the SSID and password for that network. We recommend setting up the animator on your guest network. Guest networks don’t need your main password and allow your guest to play too :).
- Insert the card in a microSD card reader on your computer.
- Power off your animator and remove the microSD card.
- Make a copy of env_example.json file
- Rename the copy to env.json
- Edit the env.json file with your SSID and password
- After you made your changes reinsert the microSD card in the animator and power on your animator
- Navigate to the “web options menu” and activate “Web page on” by pressing the right mouse button.
- Confirm the web page works by navigating to animator-feller.local in your browser.