
The following instructions show you how to hook up your Lightning product. This is the older version of lightning. If yours came with a subwoofer and amp go to the lightning preamp version at the following link. https://www.jimmytrains.com/animator-lightning-preamp-instructions/
What’s in the box
Your Lighting product comes with the following parts
- Stereo Animator controller
- 32GB microSD card
- Two switches
- Two speakers
- microSD adapter
- 5V power supply
- Bar and bolt set 1
- Light connection cable
Remove from packaging.
Open the top of the box. The bottom has the cardboard specification circle. You don’t want to open this end.
Grab the two speakers and lift the whole assembly out. Once removed un tape the animator controller speaker, and power supply from the cardboard insert.
Remove the inner box that contains the bar and bolt set. The box contains a microfiber towel. Only use this towel to clean the acrylic parts to prevent scratching.
Familiarize yourself with the animator controller
Switch ports
The controller has headers for switches labelled S1 to S4 on the board. If you have a replacement controller they are attached and label left and right. Extended them as needed.
Light control ports
It also has headers for light control labelled M1 to M8 on the board. If you have a replacement controller the light control cable is label NEOPIXEL.
Power supplies
You can power your animator in two ways
- At the top left of the animator controller is 12 – 18 volt ac/dc terminal block to power the animator using your train transformer. We recommend running at 16 volts ac. If you have a replacement controller the power cable is labelled 12-18 AC/DC and comes with a male and female cable.
- At the top center is the USB input where you can connect the USB power supply. If you have a replacement controller the USB input is at the side.
- Only use one of these power methods do not connect both.
USB port
This port is also used to change code on the animator. This is done by connecting to a computer using a USB-A to microUSB cable. It also can be powered using this port as previously described.
MicroSD port
To the left of the animator is the microSD port with a microSD card preinstalled. This card holds the sound files used by the Lightning program. This can be updated by removing it and putting new files on it from your computer.
Speaker connection
On the right side of the animator is the left and right speaker terminal block.
Let’s connect everything up
Connect the speaker to the terminal block by inserting the wire into the small hole in the terminal block. Tighten with a small flat head screwdriver until its is tight enough so that you can’t pull the wire out. Don’t over tighten.
Next attach the light control cable into M1 with the black wire facing down.
Next attach the switches. Plug the left button into S1 with the black wire facing down and the right into S2 with the black wire facing down.
Next lets connect the lights. The animator is setup from the factory with a sting order of bar-10, bolt-4, bar-10, bolt-4, bar-10, and bolt-4. Each light has a label bar-10 or bolt-4. First plug the male end of the first bar-10 into the light connection cable then plug in bolt-4. Repeat this 2 more times.
Powering up the animator
Now plug in the 5 volt power supply into the animator.
The animator will startup and when successful it will announce “animations active”
Press the left button and the animation sequence will start. Check that all the lights are illuminating. They will go off randomly with the lightning sounds.
You can stop the sound track by pressing the left button again.
Mounting the animator control and speaker to your layout.
The animator has keyhole in the back 3″ apart that you can use to mount the controller to your layout frame.
The speaker box has 8 screw holes which are sized to take a No 6 sheet metal screws. I use pan heads which will self tap. The hole depth is 1/2″ so choose the correct length screw as needed.
The packaging has cardboard templates if you want to use them to mark out your hole locations.
Install the bars and bolts in your scenery display
Your each light in your Lightning product comes has a clearance hole sized for a number 6 sheet metal screws. Use these holes to mount your lights in your scene. You might want to mount them to some sort of wood structure you paint white.
The bars were design to provide general illumination behind your clouds. The bolt can be installed in the clouds where the bolts shine from the clouds. Experiment with what looks the best in your application. Be creative bolts can shoot sideways too :).
Operation
There are two buttons. The left button activates the animation. The right button activates the main menu.
After the animation is started you can interrupt it by pressing the left button.
Continuous mode
If you want animations to run continuously you can hold the left button down until you hear the announcement “Continuous mode activated…”
To deactivate press and hold the left button until you hear “Continuous mode deactivated”
Main menu
If you press the right button a message will play “main menu press left button to scroll through items press right button to select the item”.
Press the left button and different options will play. When you hear the option you want press the right button. Further instructions will play for each menu option. If the menu has an “Exit this menu” option use that to get back to “animations are now active”. Menus without “Exit this menu” will automatically go back to “animations are now active”.
Menu summary
- Choose Sounds
- Alien light show
- Dark thunder
- Epic thunder
- Firework
- Halloween thunder
- Inspiring cinematic light show
- Thunder and rain
- Thunder with birds and rain
- Thunder distant
- Randomly choose all sound tracks
- Randomly choose built in sound tracks
- Randomly choose my sound tracks
- Song 13, Song 14 …. (These are your added songs)
- Volume settings
- Volume level adjustment
- Lower volume
- Raise volume
- Hold the right button to commit changes
- Volume pot off
- Volume pot on
- Volume level adjustment
- Light string setup menu
- Hear light string setup instructions
- Reset lights to defaults
- Hear current light string settings
- Clear light string
- Add lights to light string
- Left or right button to scroll through options
- Press and hold right button to add the light choosen
- Press and hold the left button to commit all the changes
- Exit this menu
- Webpage options
- Web page on
- Web page off
- Hear web url
- Hear instruction on how to enable web access
- Exit this menu
- Exit this menu
Choose sounds menu
This option is the most commonly selected menu option. These instructions will demonstrate how to use the main menu.
If you press the right button a message will play “you have entered option mode there are two buttons on the top of the device. The first button will advance through a menu of options the second button will select the option.
Press the left button. When you hear “Choose sounds” press the right mouse button to confirm. You will hear another menu announcement “Sound selection menu…”
Now you will be in the sound selection menu.
Press the left button to scroll through built in songs, your added songs or random sound options.
- Randomly choose all sound tracks
- Randomly choose built in sound tracks
- Randomly choose my sound tracks
Once you have found the option you want press the right button and it will confirm with “you have successfully selected your option, animations are now active”
Animator web page
Your Animator – Lightning product can serve a web page on your local network and will look like the following.
You can use the webpage to activate animation and change settings from your phone, tablet or computer. All you need to do is be connected to your local wifi network. Access the feller webpage by typing “animator-lightning.local” in your browser.
Click on the tabs “Animations, My Animations, Light String, Settings” to access other pages. The other pages let you change settings.

Animations
On the animations page you can pick random sound tracks or a specific sound track. If you click on “Continuous Mode On” the sound track will play continuously.
Note: When choosing any option on the web page the button will change to a lighter color indicating it is in process. You can press other buttons but they will not be processed until the sound track is finished.
My Animations
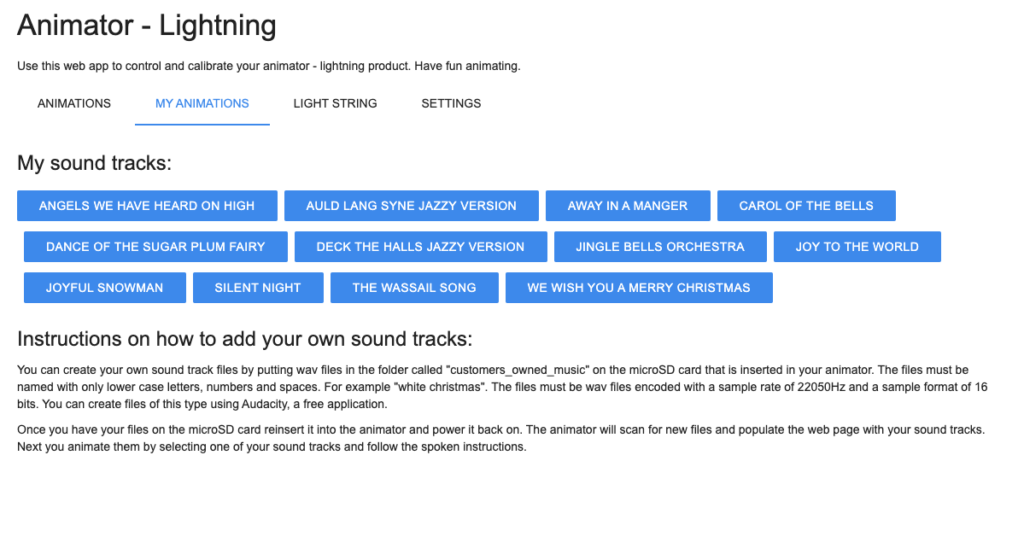
This page will list the songs you installed on your animator. I installed Christmas music here for you to enjoy. You can add your own songs or remove the one you don’t want. See section “Adding your own songs” for more instructions.
Light String

This page is where you can test your light and set them up. Pressing “Clear” will clear the current settings. Then you can press “bar-10”, “bolt-1”, “bolt-2″… to add lights in the order you have connected them in. Press “Save” to save the selections.
You can also customize the bolt color for special events. For example if you wanted red lightning and green bars. Click the color blocks and a color selector screen will show.
You can reset them to the default colors by pressing the “reset to incandescent colors” or “reset to incandescent colors” button.
Settings

This page will allow you to set different settings.
Pressing “volume pot on” will set the volume control to using the pot on the animator controller. If you would like to set the volume to a set value instead press “volume pot off” and the volume will be set to the value shown. In this case it is “20”. You can further adjust the volume by pressing the other buttons.
The animator web page name can be changed. Just type in the name desired and press change. The web page will now broadcast at url entered plus dot local appended to the end. This is useful if you have more than one animator and want to distinguish between them.
“Reset to defaults” will set the animator to the factory defaults.
“Time stamp mode on” will set your animator in timing mode where you can use the right button to set the transition points in your song. This is used for timing your own songs or can use it to retime the built in tracks if you want. Once set the song you select will be in timestamp mode and you need to press the right button at key points in the song that you want a transition.
“Reset animation timing to factory defaults” will reset the build in songs timing in case you retimed them and want to set them back.
Enabling webpage access
To enable web access to your animator you will need to make changes to your microSD card that is inserted in your animator.
The animator is a ioT device and only works on a 2.4G network. So set the SSID and password for that network. We recommend setting up the animator on your guest network. Guest networks don’t need your main password and allow your guest to play too :).
- Insert the card in a microSD card reader on your computer.
- Power off your animator and remove the microSD card.
- Make a copy of env_example.json file
- Rename the copy to env.json
- Edit the env.json file with your SSID and password
- After you made your changes reinsert the microSD card in the animator and power on your animator
- Navigate to the “web options menu” and activate “Web page on” by pressing the right mouse button.
- Confirm the web page works by navigating to animator-feller.local in your browser.
Adding your own songs
To add your own songs onto the animator you can do this by first converting your songs to a wav file encoded with a sample rate of 22050 Hz and a sample format of 16-bit. They must be in stereo.
You can do this with audacity a free application. https://www.audacityteam.org/
Once you have installed audacity open the music file that you want to put on the animator. Click on the audio setting and change the sample rate to 22050 as shown, Make sure the sample format is set to 16-bit and click OK.
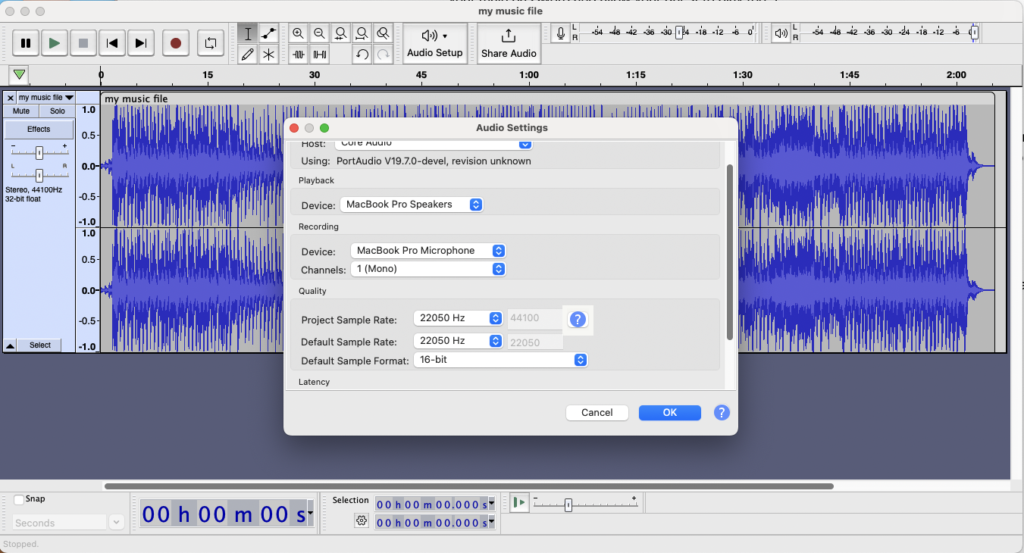
Then go to the file menu and choose export/export as wav. Then save the file to the microSd card under the “customers_owned_music” and name it with lower case letters and spaces like “my music file.wav”.
Repeat this for the rest of your songs.
Next you animate them by selecting one of your sound tracks and follow the spoken instructions.
To find your songs choose them from the web page. If you choose the sounds menu instead scroll toward the end of the menu, and they will be named something like song one zero, song one one, etc.
Once selected press the left button to start the animation. You should get a message like “No timestamp file found for this sound track, do you want to switch to timestamp mode? Press right button to activate left button to skip.”
If you press the right button you will get further instructions like.
“You are now in timestamp mode. Press the left button to start your animation. Once the sound track starts press the right button for each point that you want an animation change. Time your button
presses to key moments in the sound track. Continue to do this until the animation finishes. Then timestamp mode will be automatically turned off and your animation will be ready. Have fun animating.”
Note: Typically you want your button presses a second or more apart any faster then a second will give undesirable results.
Repeat the above steps for all your songs.