
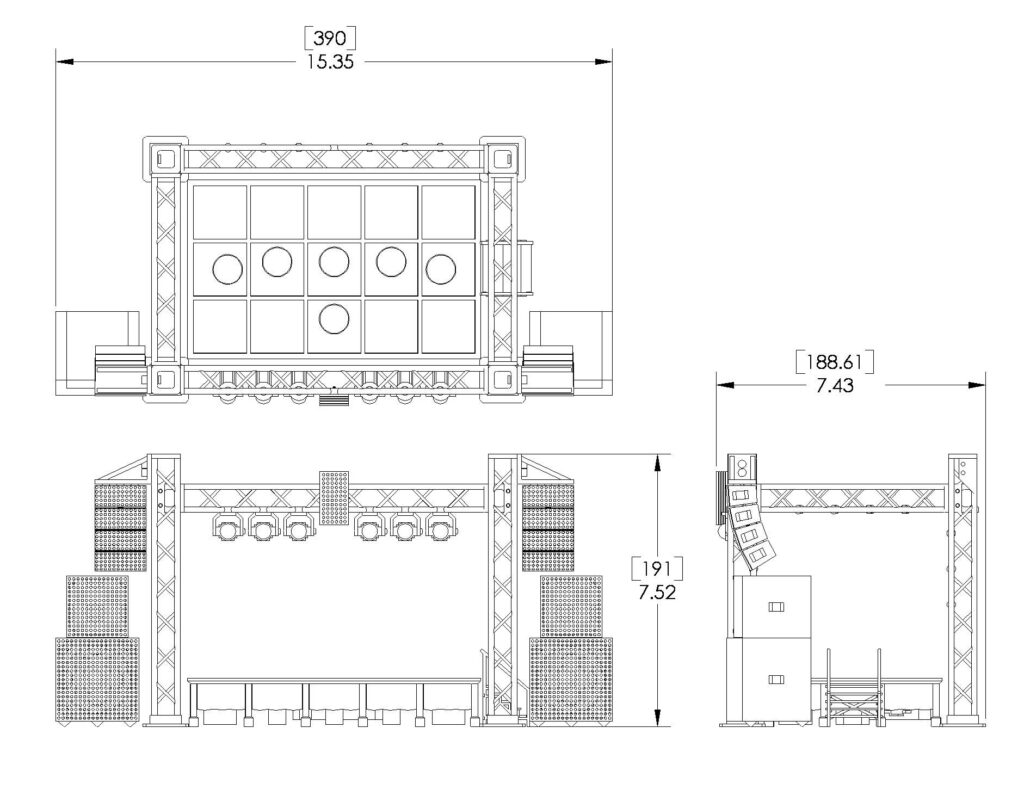
Product dimensions
Unpacking items
Your bandstand was shipped partially assembled. Carefully remove each layer from the box as shown using the finger holes in the cardboard. Then detach all the components by carefully removing the blue tape attaching each piece to the cardboard layer.
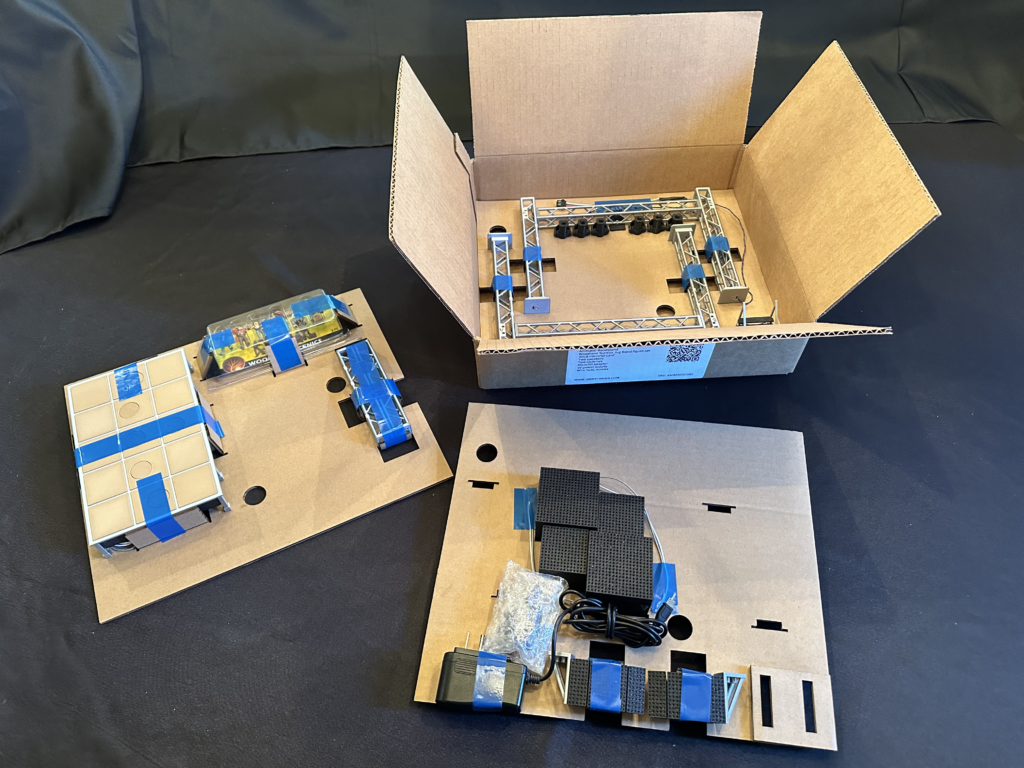
You should have the following parts.
- Bandstand stage
- One front preassembled spotlight scaffold (marked with A, B, C and D)
- One rear preassembled scaffold (marked with A and B)
- Two front to back scaffold pieces (one marked with As and one marked with Bs)
- Left line array speaker, non operating (marked with D)
- Right line array speaker, non operating (marked with C)
- Two full range speakers, operating
- Woodland scenics jug band
- 5 volt microUSB power supply
- microUSB adapter
- Screws
- Wire nuts
- Stairs
Assemble the scaffold
Using the screws provided carefully attach the line array speakers, do not over tighten. There is a left and right version and they go onto the spot light scaffold as shown. To aid in assembly each speaker has a letter on it D or C. Match the corresponding letter on the speaker to the one on the scaffold.

Next attach the front to back scaffold pieces to the spotlight scaffold with the screws provided, do not over tighten. To aid in assembly each piece has the letters A or B on them. Gravity will keep the assembly upright, but you might want to tape it down with painters tape so you don’t accidentally tip it over.

Next attach the rear scaffold with the screws provided, do not over tighten. The scaffold is complete, carefully set it aside.

Power it up!
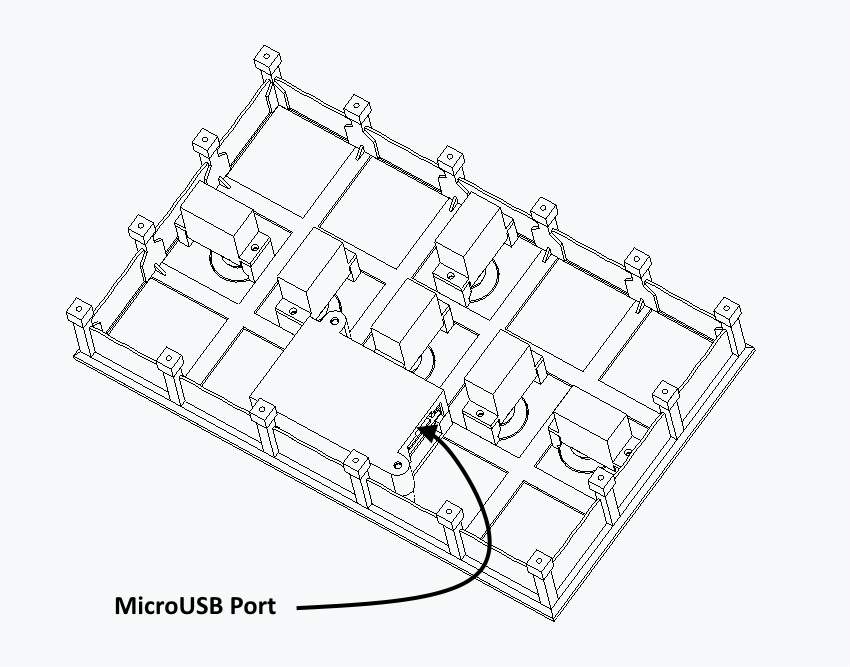
Turn the bandstand stage over and pull out the speaker wires and the switches. The switches are wrapped in bubble wrap. Remove the bubble wrap. Note: all wires are marked.
Plug the 5 volt power supply into the microUSB port on the animator controller as shown. Note: the longer side on the connector is up, do not force it in.
Using the wire nuts provided attach the left and right speakers to the wires marked left spk and right spk. Make sure you match the white and grey colors of the speakers or they will be out of phase.
Plug the spot light cable in.
Everything should now be connected. Plug in the power supply to the outlet. The bandstand will initialize and “animations are active” should be heard.
Start the animation by pressing the left button. Stop the animation by pressing the button again.
The platforms should rotate and the spot lights should light up in sync with key moments in the music track.
Mount the figures
Reset the power by unplugging and plugging in the power supply. During a power reset the platforms will be initialized to the 90 degree position. This is needed before mounting the figures. Once the bandstand says “animations active” you can unplug the bandstand.
Mount the figures on the rotating platforms facing forward. You can mount the figures as you like, but we recommend placing the banjo player in front.
Be careful when mounting the figures, they are delicate. We recommend mounting them so they can be easily removed. We have found hot glue works pretty well.
Find a location for your bandstand
The stage, stairs and scaffold are separate pieces that can be placed on your layout one at a time. You will need to drill and/or cut holes for you speakers, the spotlight cable, 5 volt power supply and switches. Cut them large enough to pass the connectors through as needed.
We recommend that you do not attach the stage, stairs or scaffold permanently to the layout. This is because you will be moving them to adjust the volume or put more songs on the microSD card.
Note: The volume pot can be overridden in the menus if you choose to set the volume using the buttons instead.
Adjust the spot lights
While the animation is running you can adjust the spot lights by rotating them left and right and up and down to point at the figure you want. Be gentle when rotating them. We recommend holding the rotating base while adjusting up and down.
Operation
There are two buttons. The left button activates the animation. The right button activates the main menu.
After the animation is started you can interrupt it by pressing the left button.
Continuous mode
If you want animations to run continuously you can hold the left button down until you hear the announcement “Continuous mode activated…”
To deactivate press and hold the left button until you hear “Continuous mode deactivated”
Main menu
If you press the right button a message will play “main menu press left button to scroll through items press right button to select the item”.
Next pressing the left button will scroll through the different options. When you hear the option you want press the right button.
Further instructions will play for each menu option.
If the menu has an “Exit this menu” option, use that to get back to “animations are now active”. Menus without the “Exit this menu” option will automatically go back to “animations are now active”.
Menu summary
- Choose Sounds
- Babys left Dallas
- Banjo romp
- Boxcar blues
- Fried taters bluegrass
- Hey honey
- Home cookin
- Ragga muffin
- Rattlesnake blues
- Tap room rag
- Song 10, Song 11 …. (These are your added songs)
- Volume settings
- Volume level adjustment
- Lower volume
- Raise volume
- Hold the right button to commit changes
- Volume pot off
- Volume pot on
- Volume level adjustment
- Webpage options
- Web page on
- Web page off
- Hear web url
- Hear instruction on how to enable web access
- Exit this menu
- Add my sound or animate them
- Hear instructions
- Time stamp mode on
- Time stamp mode off
- Exit this menu
- Exit this menu
Choose sounds menu
This option is the most commonly selected menu option.
Press the right button to get into the main menu.
Then press the left button. When you hear “Choose sounds” press the right mouse button to confirm. You will then hear another menu announcement “Sound selection menu…”
Press the left button to scroll through the built in songs, random sound options, and your added songs (indicated by Song 10, Song 11 …).
The random sound options are:
- Randomly choose all sound tracks
- Randomly choose built in sound tracks
- Randomly choose my sound tracks
Once you have found the option you want press the right button and it will confirm with “you have successfully selected your option, animations are now active”
Animator web page
Your Animator – Bandstage product can serve a web page on your local network. To access the bandstand web page type “animator-bandstand.local” in your browser.
You can use this web page to activate animation and change settings from your phone, tablet or computer. All you need to do is be connected to your local wifi network.
Click on the tabs “Animations, My Animations, Settings, Animation Tables” and the following pages will be displayed.
Animations
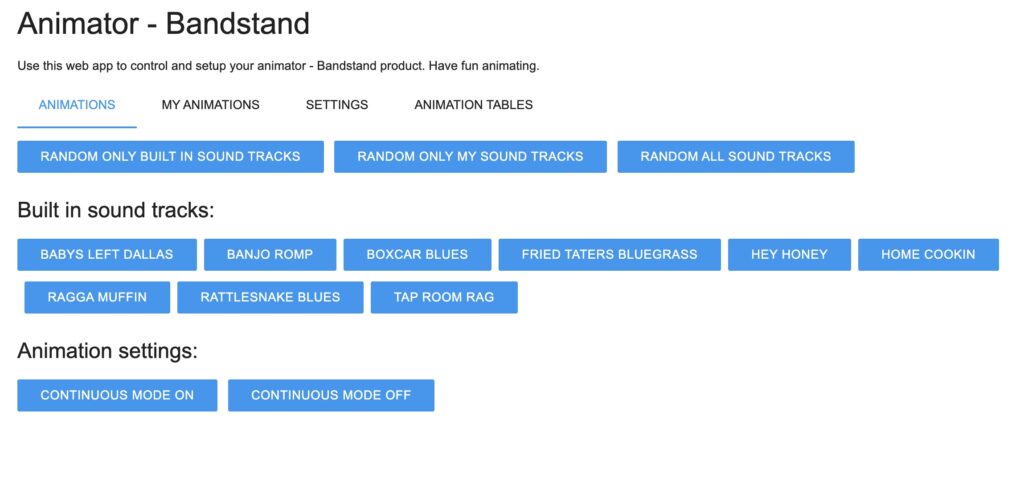
On the animations page you can pick random sound tracks or a specific sound track. If you click on “Continuous Mode On” the animations will run continuously.
Note: When choosing any option on the web page the button will change to a lighter color indicating it is in process. You can press other buttons but they will not be processed until the previous one is finished.
My Animations
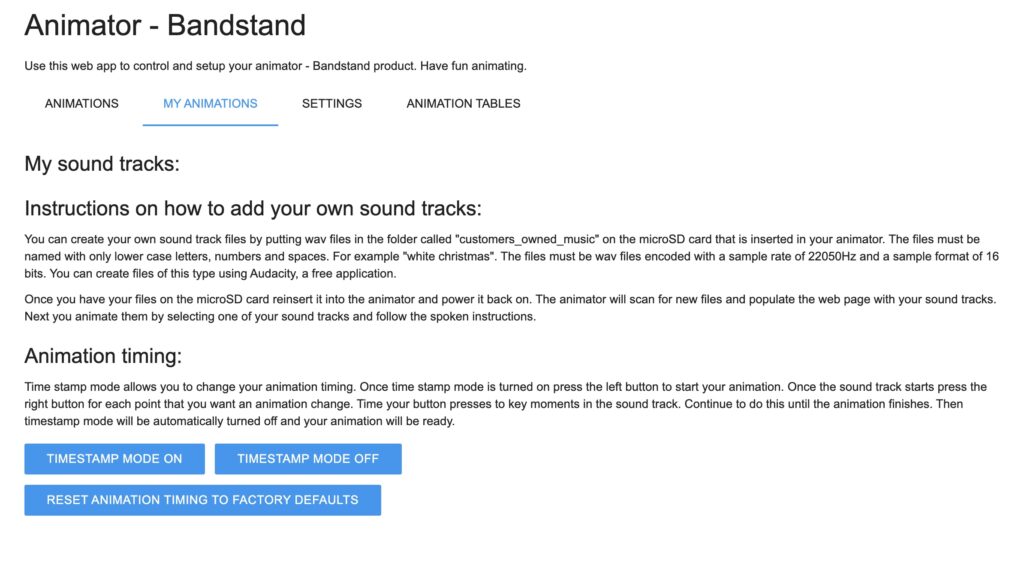
This page will list the songs you installed on your animator. The list above is blank because you need to install them your self.
Settings
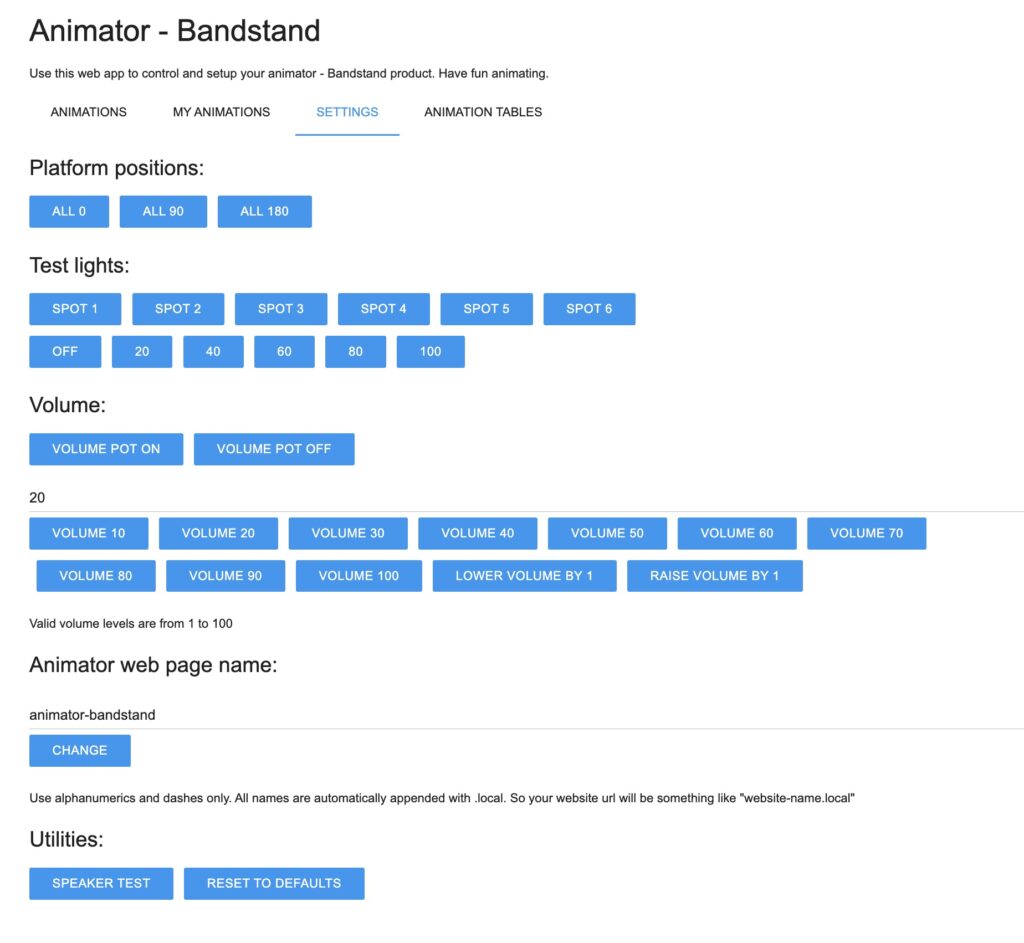
This page will allow you to set different settings.
Pressing “volume pot on” will set the volume control to use the pot on the animator controller. If you would like to set the volume to a set value instead press “volume pot off” and the volume will be set to the value shown. In this case it is “20”. You can further adjust the volume by pressing the other buttons.
The animator web page name can be changed. Just type in the name desired and press change. The web page will now broadcast at url entered plus dot local appended to the end. This is useful if you have more than one animator and want to distinguish between them.
“Reset to defaults” will set the animator to the factory defaults.
“Time stamp mode on” will set your animator to timing stamp mode where you can use the right button to set the transition points in your song. This is used for timing your own songs or can use it to re-time the built in sound tracks if you want. Once set the song you select will be in timestamp mode and you time animation points by pressing the right button at key points in the song where an animation to occur.
“Reset animation timing to factory defaults” will reset the build in songs timing in case you re-timed them and want to set them back.
Animation Tables

Each animation is controlled by a script table. The script table consists of a TimeStamp, which is when the animation will happen, a TimeCode (This is only used is you want to precisely set the TimeStamp using the timeline marker in Davinci Resolve) and the animation commands.
To get the timeline, first press the track you want to change. This will download the timeline to the table. Then edit the animation commands as desired. You can test the animation commands by pressing “TST” on each row.
You can insert “INS”, add “ADD” or delete “DEL” timeline rows as desired.
Once you have made all the changes you want press “SAVE ANIMATIONS”.
SNXXX servo command
S = servo, N = which one, 0 is all, 1 is servo one, 2 is servo 2…, XXX = angle 0 to 180
This is the servo command. There are six servos. S00 will set all servos to 0. S0180 will set all servos to 180. If you want to set just one servo S10 will set servo 1 to 0, S2180 will set servo 2 to 180 and so on.
LNXXX light command
L = lights, N = which one, 0 is all, 1 is spot light one, 2 is spot light 2…, XXX = intensity 0 to 255
This is the spot light command. There are six spot lights. S00 will set all spot lights to off. S0255 will set all spot lights to full on. If you want to set just one spot light S10 will set spot light 1 to off, S2180 will set spot light 2 to 180 and so on.
BXXX brightness command
B = brightness, XXX = intensity 0 to 100
This is the spot light brightness command. B0 will turn all the lights off. B100 will set all lights to full brightness. Note: This will not override the settings set using the LNXXX command. It is primary used before using the FXXX command to fade lights.
FXXX fade command
F = fade, XXX = intensity 0 to 100
This is the spot light fade command. F0 will fade all the lights to off. F100 will fade all lights to full brightness. B100, F50, will set full brightness and then fade lights to 50.
Enabling web page access
To enable web access to your animator you will need to make changes to your microSD card that is inserted in your animator.
The animator is a ioT device and only works on a 2.4G network. So set the SSID and password for that network. We recommend setting up the animator on your guest network. Guest networks don’t need your main password and allow your guest to play too :).
- Insert the card in a microSD card reader on your computer.
- Power off your animator and remove the microSD card.
- Make a copy of env_example.json file
- Rename the copy to env.json
- Edit the env.json file with your SSID and password
- After you made your changes reinsert the microSD card in the animator and power on your animator
- Navigate to the “web options menu” and activate “Web page on” by pressing the right mouse button.
- Confirm the web page works by navigating to animator-bandstand.local in your browser.
Adding your own songs
To add your own songs onto the animator you can do this by first converting your songs to a wav file encoded with a sample rate of 22050 Hz and a sample format of 16-bit. They must be in stereo.
You can do this with audacity a free application. https://www.audacityteam.org/
Once you have installed audacity open the music file that you want to put on the animator.
Then go to the file menu and choose export/export as wav. On the export audio screen change the sample rate to 22050 as shown.
Note: Your screen might be different than the one below. See audacity documentation for details.

Then save the file to the microSd card under the “customers_owned_music” and name it with lower case letters and spaces like “my music file.wav”.
Repeat this for the rest of your songs.
Once you have all your files on the microSD card reinsert it into the animator and power it back on. The animator will scan for new files and populate the web page and choose sounds menu with your new sound tracks.
Next you animate them by selecting one of your sound tracks and follow the spoken instructions.
To find your songs choose them from the web page. If you choose the sounds menu instead scroll toward the end of the menu, and they will be named something like song one zero, song one one, etc.
Once selected press the left button to start the animation. You should get a message like “No timestamp file found for this sound track, do you want to switch to timestamp mode? Press right button to activate left button to skip.”
If you press the right button you will get further instructions like.
“You are now in timestamp mode. Press the left button to start your animation. Once the sound track starts press the right button for each point that you want an animation change. Time your button
presses to key moments in the sound track. Continue to do this until the animation finishes. Then timestamp mode will be automatically turned off and your animation will be ready. Have fun animating.”
Note: Typically you want your button presses a second or more apart any faster then a second will give undesirable results.
Repeat the above steps for all your songs.